Friday, June 01, 2012

A favorite............. revisited

I am about to share one of the better chili recipes I have come across.  I wrote the original  entry  a few years ago. Since then I have found this recipe that's a pretty good replication of the ever popular Wendy's chili.


1 pound ground beef
1 - 14.5 Oz. can tomato sauce
1 - 14.5 Oz. can fire roasted diced tomatoes
1 - 14.5 Oz. can kidney beans (with liquid)
1 - 14.5 Oz. can pinto beans (with liquid)
1/2 cup diced onion
1/4 cup diced green chilies
1/4 cup diced celery
2 medium tomatoes, chopped
1 teaspoons cumin powder
2 tablespoons chili powder
1 teaspoon black pepper
   salt if needed
1 cup water (instead of water I use beef broth, gives the chili a richer flavor)

1. Brown the ground beef in a skillet over medium heat; drain off the fat.
2. Using a fork, crumble the cooked beef into pea-size pieces.
3. I saute the onion & celery instead of putting it in raw.
4. In a large pot, combine the beef plus all the remaining ingredients,
and bring to a simmer over low heat. Cook, stirring every 15 minutes,
for 2 to 3 hours.
For extra heat I will add a few dashes of Frank's hot sauce or a small can of Hatch red enchilada sauce.
Makes about 10 servings.

Most of the time I make this I double the recipe.


 This was posted  in 2009 but we are still enjoying the meal and now we have found a great chili to make this chili size

In many parts of the USA the weather is a bit warm and may not be chili weather. Where we are in southwestern Colorado there is still snow on the mountain peaks and it's a bit cool in the evenings.

This is one of my favorite go to dishes for a cool lazy Sunday evening.

Start by making your favorite chili recipe.....................now follow the photos and you'll end up with a delicious dish.

start off with a burger patty in a bowl suitable for chili


next ladle chili over the burger


follow that with some diced onion and grated sharp cheddar

There ya have it.........my olde standby go to meal when you want something hearty, warming and comforting. Add some toasted sourdough bread and a beverage of your choice, just remember to make enough because seconds will be requested I'm thinking.


Friday, May 20, 2011

Request from my husband

"do it the way your sister does it".  Husband is referring to a poached egg.
Here's my story.  For the past 37 +/-  years I have struggled making my dear husband a poached egg on toast.  A favorite breakfast of his.  Seems like cooking eggs of any kind would be a bit of a struggle early on in our marriage.  Like hard boiled eggs but that can be another post.

So over the years I tried different ways and methods of poaching that egg.  Almost everytime I put that egg on the toast and put it in fromt of my dear husband, the yolk starts oozing out.  Well that's not the way a poach egg is supposed to be served.  We'd go to breakfast and the first thing dearest would order would be a poached egg.  Well dang it out it comes all pretty and intact. 
Once I grabbed a waitrees to ask her what the secret is in keeping the egg firm in water...................vinegar she says.  It firms to whites.  Well surely you must know I tried that.  One time too much another time not enough..........CRAP  I say!!

Fast forward to a few years ago while vising my sister.  She offers her husband and mine breakfast, they voted on poached eggs on toast.  I said  "I'll butter the toast". 

Wait till ya read this..........it is so simple and obvious why the heck did I never think of this.  The following is dear sister's method of poaching an egg.  And if you ever have trouble poaching an egg think of my many years of struggle.
*Moon's method of poaching an egg*
Heat an 8 inch pan put a little bit of butter or margarine in the pan to melt.  I use Smart Balance
Heat, in the microwave or on the stovetop, a couple a cups of  water.
Break the egg into the pan after the butter has melted.  Keep the heat med and cook the egg just enough to seet the egg white.  Now that water that you heated, gently pour that water into the pan with the egg.  Cook egg till the desired hardness of the yolks.  Scoop egg out of the water, drain a bit then place on your toast or english muffin. 
The springtime aspargus has been so good lately I had a bit leftover.  Put the warmed asparagus on the toast that  I spread with a dollop of chipotle mayo then the egg on top.

Needless to say I have a very happy spouse!!

Found the following over on Whole Foods recipe  blog

Eggs Five Ways

  • Top a beef or turkey burger with an over-easy egg and a slice of turkey bacon for a knife-and-fork burger that puts the regular ones to shame. Who says you can't have burgers for breakfast?
  • Tired of fried egg sandwiches? Slice hard-boiled eggs and layer them on buttered toast instead.
  • Toss scrambled eggs with leftover brown rice and steamed veggies for a hearty lunch.
  • Top rice cakes with a thin smear of miso and sliced hard-boiled eggs for a healthy breakfast.
  • Arrange slices of hard-boiled egg on whole wheat bread, top with a dollop of cottage cheese, slices of avocado and salt and pepper.


Saturday, April 09, 2011

Re post of Pasta with Pepper and Cheese

Pepper&cheese pasta
This is a re post/update to an earlier post Spaghetti with cheese and black pepper. This time I did not use Parmesano Reggiano. I had the Trader Joe Parmesan grated in the tub. I always have that in the fridge and honestly, I mean honestly it was just as good. I know, there will be some purists that disagree but go for it. I also made it exactly as the recipe with nothing else added.

This is such a fantastic, last minute out of the pantry dishes, you've got to try it and add it to your list of favorites. It seems like quite large for two but the leftovers are great. Just reheat in a skillet with a bit of oil and you've got a second meal. I had some leftover sausage and I'll chop those and throw them in for lunch. Yum.

If you're serving this to friends be sure to use the Italian name, Spaghetti Cacio e Pepe, it sounds better.

Friday, March 18, 2011

The other white meat


Isn't that what they call pork? Well I'm a big fan of pork loins cooked on the grille. For many reasons but one it's easy, and two it's fast.

When at the market try to get a plain old pork loin, not one that been injected with flovoring. Don't want a butcher dictating what is in my meat.
I marinated this particular piece in mojo , which is a bottled Cuban sauce. Of course how and what you cook your pork loin does influence how you prepare your leftovers.  Watch the temperature (approx 140-145*) and remember this still cooks once removed from the grille.  Place on a platter tented with foil while you finish roasting some fresh veggies, your choice.  For this I did fresh yellow and red bell peppers and some cute tiny yukon gold potatoes.  This meat is so tender you can cut it with a fork.

Posted by Picasa

Thursday, March 17, 2011

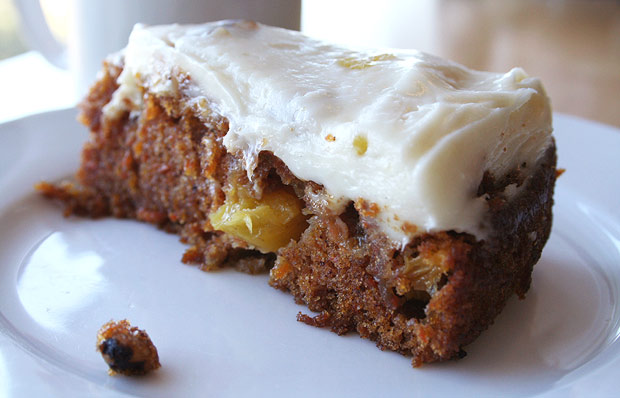
Carrot cake ala Outdoor dutch oven

Love to cook outside in the cast iron and I'm getting ready for our annual teardrop camp out so thought I try my new carrot cake recipe. Worked wonderful. Just as tender and fluffy as one baked in my indoor oven and now I can't wait to make it at the potluck.

Here is the link to Mrs. Garrett's Carrot Cake.

If you are interested in more recipes for outdoor cooking visit the Cast Iron link.


Sunday, March 06, 2011

What no roast chicken

So I stopped by the big box store on the way home for a roast chicken, actually I was going to get two so I could make a tasty chicken salad for lunch over the weekend, much to my dismay they were sold out.  WHAT the heck!!  Run to the back, pick up a roastable chicken and while waiting in line thinking hope it's not too hot to turn on the oven.

On the way home I remembered  a roast chicken I made  with some lemons stuffed inside.  Gotta go find that recipe.  FOUR YEARS AGO!!!  holy cow time flies.  It's nice to revisit some of our olders posts and this one especially I really like.  Before it gets too hot to turn on your oven make this chicken.  I know it's so easy to buy the roasted one at the market but trust me you'll be glad you did.

April 12, 2007 is the original post.
This has to be my favorite way to roast a chicken. It is a recipe adapted from a recipe from Giada DeLaurentis. This is a very rich tasting chicken that I served with roasted red potatoes and carrots.
I did place cleaned carrots on the bottom using them as a rack for the chicken and it's the lemons, garlic and oranges that you place in the cavity so don't skimp on that.


Garlic and Citrus Chicken
1(5 to 6-pound) whole roasting chicken, neck and giblets discarded I don't discard these little gems I cook them in some broth and use them at a later time
Salt and freshly ground black pepper
1 orange, quartered
1 lemon, quartered I used two lemons they were kind of small
1 head garlic, halved crosswise, plus 3 garlic cloves, chopped
2 (14-ounce) cans reduced-sodium chicken broth
1/4 cup frozen orange juice concentrate, thawed  I used fresh juice
1/4 cup fresh lemon juice
2 tablespoons olive oil
1 tablespoon chopped fresh oregano leaves I used thyme
Kitchen string or butcher twine didn't have any

Position the rack in the center of the oven and preheat to 400 degrees F.
Pat the chicken dry and sprinkle the cavity with salt and pepper. Stuff the cavity with the orange, lemon, and garlic halves. Tie the chicken legs together with kitchen string to help hold its shape. Sprinkle the chicken with salt and pepper. I rubbed a bit of butter and olive oil on the bird.Place a rack in a large roasting pan. Place the chicken, breast side up, on the rack in the pan. Roast the chicken for 1 hour, basting occasionally and adding some chicken broth to the pan, if necessary, to prevent the pan drippings from burning. Whisk the orange juice, lemon juice, oil, oregano, and chopped garlic in a medium bowl to blend. Brush some of the juice mixture over the chicken, after it has baked 1 hour. Continue roasting the chicken until an instant-read meat thermometer inserted into the innermost part of the thigh registers 170 degrees F, basting occasionally with the juice mixture and adding broth to the pan, about 45 minutes longer. Transfer the chicken to a platter. Tent with foil while making the sauce (do not clean the pan).
Place the same roasting pan over medium-low heat. Whisk in any remaining broth and simmer until the sauce is reduced to 1 cup, stirring often, about 3 minutes. Strain into a 2-cup glass measuring cup and discard the solids. Spoon the fat from the top of the sauce.

Serve the chicken with the pan sauce.

Saturday, February 05, 2011

Soup, it's what's for dinner


Originally uploaded by mooncrazy
February, even though the weather is warm, is soup month for me. I can't get past the fact I'm making it wearing shorts but soup is a good "winter" meal for us.

A little spring cleaning was needed in my freezer after the holidays and January visit from relatives. I found some cubes of ham and a bone. There was also a package of chicken bones (I throw hardly anything away) left over when I boned a chicken last week. I roasted the bones with some chopped onions, carrots, and celery and then simmered the ham and chicken bones with the veggies in a large pot, about 4 quarts of water. Add some salt and pepper but remember, this is not the final product. The broth was drained through a sieve and discard everything else, it has served it's purpose. Chill in the fridge over night makes it easier to get rid of the fat. I then got busy making two soups.

Split Pea with Ham

1 lb of dried split peas, rinsed and sorted
2 quarts of broth
1 small onion, chopped
3 carrots, grated
3 stalks of celery, chopped
about 1 1/2 cups of chopped ham
salt and pepper to taste (careful with the sauce as the broth is sure to have seasoning)

Bring all to a simmer and cook uncovered until the peas are no longer peas, about 2 hours. If it gets too thick add some canned chicken broth or a bit of water. Adjust the seasonings and serve. We like cornbread to accompany it be it can be a first course if you wish. This soup freezes quite well and since it's just me and my honey, I freeze up separate containers for a future lunch.

The next soup is Artichoke Potato Puree and that post will be along any day now.


Saturday, January 29, 2011

Getty Villa Carrot Cake

If the Getty Center in Los Angeles is my passion then the Getty Villa in Malibu is my secret love. I don't get there as much as I'd like but when I do it's special.

If anyone remembers the early days at the Villa you must have fond memories of the tea room. There were delicious scones and this wonderful carrot cake. I'm adding a link to the Getty Iris for this recipe. Read the interesting story of how this cake came about.

The cake could not be easier to make and since I've acquired the recipe I've made it about four times. The latest was when we were entertaining relatives from the East Coast just this past week and it was a big hit with them.

Enjoy and if in LA visit the Getty Center or Getty Villa

Mrs. Garrett's Carrot Cake Recipe

Monday, January 10, 2011

Up until now

This is the best Posole I have ever made, which is a hearty pork stew.  Yes you can make it with chicken I suppose, I never have.

Following is my method.....adapt it to your liking and taste.

About 2 cups of chopped pork brown in a tablespoon of oil.  Brown well so you have those bits, frond I believe it's called, on the bottom of your pan. Remember to salt and pepper to taste.

Once browned add 2 boxes of Swansons chicken broth, low sodium and my secret ingredient sort of is to add about a half a box of beef broth.  I happened to have my last but favorite Trader Joe's beef broth which I used.  Let that simmer for about two and a half to three hours.  Before poppping the lid on add a a couple a teaspoons of cumin.

Put the lid on and go chop some onions and celery, shred some carrots and get two cans of hominy rinsed.  Make sure you have on hand some chipotle peppers in adobo sauce, I used only one pepper out of the small can** along with about a teaspoon of the sauce.  Also one can of Muir Glen Fire Roasted tomatoes plus a couple a tablespoons of tomato paste. 

I had some corn tortillas I had cut up in slivers and toasted, chopped some fresh cilantro and a squeeze or three of lime juice.  Normally I would add a few slices of avocado but none on hand.

This is such a warming, feel good soup/stew.............I was giddy while enjoying the flavors.


**the small can of chipotle pepper in adobo sauce is way too much to put in the posole.  With the remaining peppers I took one pepper and a bit of sauce wrapped them in foil and froze.  Since I'll be making sister's red pepper hummus I'll be using at least one packet of the chipotle peppers.
Posted by Picasa

Wednesday, December 01, 2010

My own version of food truck fare

Not the usual food beauty shot because this lunch is traveling. This week our mechanics at Christian Auto had a time with the transmission in our Honda Hybrid. Because they were not satisfied until it was perfect, I'm taking them lunch today.

What's on the menu?
Pulled pork sandwiches with coleslaw and chocolate brownies.

The pork butt was rubbed with salt, pepper, cumin, and chili pepper and roasted slow in a 275 degree oven for over six hours until it was tender enough to shred with a fork. I added some of the drippings and BBQ sauce.

The coleslaw couldn't be easier. Chopped cabbage, green and red along with shredded carrots. I did not put onion but sometimes I do. Dressing:

1/2 cup + heaping Tablespoon of Mayo
1 Tablespoon rice vinegar
3 Tablespoons sugar

Combine sugar and vinegar, stir to dissolve. Beat in the mayo. Pour over cabbage and refrigerate for at least 4 hours. I like to let it set over night.

Just wanted them to know how much we like their work. Thanks Jonathon and Shawn.


Sunday, November 21, 2010

Relish, no can

Gotta post this great recipe for the quintessential Thanksgiving accompaniment, cranberry relish. Funny thing, I never eat it. Not because I don't like cranberries, love them and their juice. Can't say exactly but it might be growing up that jellied-from-the-can stuff was always on our table.

Because I can't shamelessly post this as my own creation I'll give credit to Pioneer Woman. Her recipes always seem to need a little adjustment and this one took less than most. Here is our version.

1 twelve oz. bag of fresh cranberries
1 sixteen oz bottle of POM, pomegranate juice
3/4 cup of sugar

If you like a looser sauce add all the juice. If you like a firmer sauce take out about a quarter cup but don't toss it, drink it; it's really good. Sugar, too, give it a taste and add more but we like ours on the tart side.

Combine all into a large sauce pan and bring to a slow boil--medium low hear-- lid off. Cook for at least twenty minutes, stirring occasionally to prevent burning. All those wonderful little berries need to pop and the juice reduce a bit. Cool and refrigerate. I think it tastes better the next day but hey, if don't it will be ok. It will thicken a bit more when it cools.

See I told you it was easy.

Thursday, November 18, 2010

If you like cranberries

I am bringing back this delicious dessert  because it is easy to put together and always a huge hit for a big meal like the upcoming Thanksgiving,  And if you are going as a guest tell them "I'll bring the dessert".    We have already had our family Thankful Day but I'm goin to make this for when Sister and Bro in law come up for the day next week.  I see a good hearty soup and this tasty dessert after an afternoon at the movies.
 
Cranberry Tart
3 cups (12 oz bag) rinsed cranberries
¾ cup chopped pecans
½ cup sugar
¾ cup melted butter
2 large eggs slightly beaten
2 tbls orange juice ***
1 cup sugar
1 cup all purpose flour

Butter and lightly flour a deep 10 inch pie plate or a 10 x 2 quiche dish.

Place cranberries in the bottom of the pan, sprinkle with the pecan pieces, then sprinkle the ½ cup sugar.

Now in a bowl combine the melted butter, eggs, juice (when I have a fresh orange I will add a bit of orange zest) and the 1 cup of sugar. Add the flour and whisk till smooth. Pour mixture over the cranberries.

Bake at 325 degrees for approximately 45 minutes. Insert the old toothpick in the center to check for doneness.

Let cool…………………add a scoop of really good vanilla ice cream or not.

Wednesday, October 20, 2010

Tomato Tart

I can't find the derned photo I took of this
Tomato tart
Ingredients

2 Small Tart Pans I used a 9 inch pie plate
Butter (for Greasing The Pan)
½ cups All-purpose Flour
¼ teaspoons Salt
¼ teaspoons Sugar
3 Tablespoons Cold Unsalted Butter (cut Into Small Pieces)
4 teaspoons Ice Water, Or More As Needed
half of one medium onion   I used a vidalia
tomato for a 9 inch pie I used three larger tomatoes
Salt & Pepper To Season I also used fresh basil chopped fine
freshly grated parmesan cheese
goat cheese I'm not fond of goat cheese cooked so I used gorgonzola and mozzarella
Olive Oil

Preparation Instructions

To make the tart dough: OK I make the very worst pie crust ever so I cheat and use Marie Callenders frozen pie crust, nice and flaky and fine for this dish

1) Put flour, salt & sugar in food processor and pulse to blend. Sprinkle the pieces of (VERY COLD) butter over dry ingredients. Pulse until butter pieces are reduced to small pieces.

2) Sprinkle ice water evenly over dry ingredients & butter, pulse until small clumps form. (You may add more ice water as needed.)

3) Take dough out of processor, press together lightly to form ball. Divide in half, pat each half into a disc, and wrap each in plastic wrap or waxed paper. Chill for 30 minutes.

To make tarts:

1) Preheat oven to 375 degrees Fahrenheit. I bake at 350 degrees

2) Thinly slice onion and cook in 1/2 tablespoon of olive oil over medium-low heat until nicely caramelized. (This should take about 10-15 minutes.) Season with salt and pepper.

3) While onions cook, de-seed and slice your tomato. Season lightly with salt and pepper. I don't mind the seeds

4) Remove tart dough from refrigerator and roll out into discs a bit larger than your tart pans. Be sure to BUTTER your tart pans (trust me on this one), and then place the dough into the pan, pressing it lightly into the bottom and sides of pan.

5) Time to layer in the tart ingredients! I spread a thin layer of Dijon mustard on the bottom of the crust first. Then several nickel size pieces of cream cheese scattered on the bottom. Put a layer of freshly grated Parmesan on the bottom of the tart, followed by some of your caramelized onions. Place tomato slices on top–you might have to cut your slices into smaller pieces to get them to layer nicely. Crumble goat cheese onto the top of the tomatoes. This is where I used the Gorgonzola Drizzle a little bit of olive oil over the top, then sprinkle with pepper. Fold the edges of the tart dough around the top. (It’s a lovely rustic look.) Brush the exposed edges with lightly beaten egg.

6) Bake your tarts for 20-30 minutes, or until the crusts are golden brown.

Note: You can easily scale this up for a larger crowd and bake it in a full-sized tart or pie pan. Use your favorite pie dough recipe, or even use a store-bought pie crust! Trust me, this one is easy, delicious, and VERY impressive-looking!

Hope you try it and then let me know what you think.

Friday, October 15, 2010

Pears

When I think of fall food that I look forward to pears they are at the top of my list for many reasons


After browsing the food magazines the other day I beat feet to the local food purveyor and bought me some pears.  I ended up with bartlett, not that that is a bad thing mind you, but I am looking forward to trying a forelle.


Pears and cheese go quite well together your favorite soft ripened cheese or a very sharp cheddar.  But think about making pear sauce instead of applesauce.

Add some cranberries and served with a pork loin you just cooked on the grille.

Just enjoy the fall pears, then you can concentrate on the pumpkins , gourds and such that are making their appearance  as well.

the little known Forelle when  ripe, cut open and you will see a blushing pear
I have a pear tart recipe I need to post for you soon.


from Washington and Oregon the very popular Comice


your basic bartlett


Sunday, August 29, 2010

Pommes Frites ...........it's all about the sauce

Pommes frites are just french fries – but since I don’t make them like traditional french fries I like to differentiate them so I can keep the recipes separate. Not only that but by using the term pommes frites I tend to think of them in a slightly better frame of mind, foodie wise, than french fries (which seem so McDonald’s like to me).  Don't get me wrong I'm a big fan of McDonald fries.

This is a twist on a very classic worldwide pairing – mayo (or even mayo and ketchup mixed together) with fries is VERY traditional, its not overly common here in the USA however. So try it next time if you haven’t yet. .
In parts of Utah, Nevada and the Northwest USA there is a popular sauce usually called fry sauce'

Fry Sauce Ingredients

1/4 cup mayonnaise
1/4 cup ketchup
1/8 teaspoon cayenne pepper
1/4 teaspoon onion powder
salt & pepper to taste

Mix ingredients till well blended.

Instead of cayenne pepper I have used a product I found when driving thru Oklahoma awhile back  called Slap ya Mama.  Nicely spiced, white pepper blend which is marked as a Cajun seasoning.  It is made by Walker & Sons from Ville Platte, Lousiana.

I also have used less ketchup and added a good BBQ sauce.

Now to the pommes frites

I try to always use russet potatoes as they produce the best fried fry. Anything else doesn’t get as crispy or dehydrates leaving only a shell behind. The only exception would be sweet potatoes, which make fantastic fries in my opinion.
Directions
Preheat the oven to 450 degrees F.
Peel potatoes and cut lengthwise into quarter-inch thick slices. Cut again into 1/4-inch thick fries. Place the potatoes into a bowl with cold water; this will help keep the fries crisp. Just before cooking, drain water and place on paper towel, pat dry.
Put the potatoes in a bowl; add canola oil, 1 tablespoon salt, 1/2 teaspoon black pepper. Toss well and lay out in 1 layer on nonstick baking sheet. Bake until light brown. Cook for approximately 30 to 40 minutes, turning frequently until golden brown.

Remove from oven, allow to cool for 1 or 2 minutes and serve with some of that sauce you made while cooking your poomes frites.

Monday, August 09, 2010

Steam driven cookies

There is a subset to the science fiction genre called Steampunk and the Underground Art Show chose it as their theme this year. Basically this fantasy sub-culture is what technology produced without electricity in the Victorian-era using steam driven engines would look like. Think Wild Wild West and you've pretty much got it or Willy Wonka, or the recent Sherlock Holmes movie with Robert Downey, Jr.

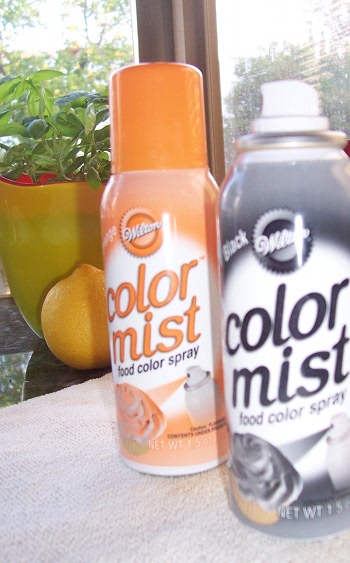
Gear driven machines are at the heart of it all so my submission for the dessert table is all decked out appropriately. This post is more of a product review than anything else because these are just plain, rollout and iced sugar cookies. I knew what I wanted to do and talked to PBE's resident chef Teri, she had the solution, Wilton's Color Mist, a spray on editable color. I made my own stencils out of heavy cardstock and iced the cookies with royal icing to give a smooth base. Then laying the stencil over the cookie and gently spraying gave me the look I was going for. I played with different layers of color. Of course you can use this spray on any dessert and a quick spray would dress up plain white cake or cupcakes.

Things to know:
  • Practice spraying first on something you can wash off
  • Give yourself lots of space because there will be overspray
  • Shake often, really shake a lot
  • Spray in a sweeping motion so as not to "puddle" the color
  • Let dry at least an hour before stacking or adding another color
I do like this product and for about $4 a can it wasn't too pricey.
And, if you lived in the Victorian-era and played guitar, this might be what an electric one looked like. Google for more creative examples of this fantasy world "Steampunk".


Thursday, July 22, 2010

Ragu: Italian gravy

Editors note: this, seemingly, is the longest recipe I've ever posted but I guarantee if you make this your family/friends will sing your praises for a long, long time.

Because I'm making ragu today I tried to remember when I posted the recipe on PBE. Come to find out, I didn't. This is from a recipe I found on Laura Rebecca's Kitchen. She was participating in a challenge from Darling Bakers and I'm not sure who had the original recipe. It is Lasagna Verdi al Forno.

It was delicious the first time I made it but way too much work so next time I used store-bought lasagna noodles and it still took forever but the ragu is what I loved so, in honor of my darling companion coming back from a short, but grueling road trip to fetch our trailer from New Mexico, I decided to spend the morning cooking up a double batch and have his partner in crime for this three-day adventure, his lovely wife and the Princess and her court, over for some splendid Italian Gravy.

My mom, an excellent cook in her own right, had met an Italian woman and they became fast friends. Reason being, they both loved to cook and sometimes I think they tried to out-cook each other but being on the receiving end of these culinary wars was a good thing. Poking through my mom's refrigerator on day for something to eat for lunch I ran across a dish of pasta with sauce. It didn't seem to have much tomato sauce but was heavy in the meat department and asked it I could have some. Momma called it Pasta and Gravy and it was the best damn ragu sauce I'd ever tasted. It wasn't until I made the ragu from the Daring Bakers had I ever even come close.

So, pick a morning, at least four hours, and make a double batch because it freezes so very nicely and you are going to want more of this gravy.

Ragu alla Contadina (country style ragu)
This recipe doubles nicely

3 tablespoons extra virgin olive oil
2 ounces pancetta, finely chopped
2 medium onion, diced
4 ounces pork loin
4 ounces mild Italian sausage
8 ounces beef skirt steak, hanging tender, or boneless chuck blade or chuck center cut (in order of preference)

2/3 cup dry red wine or broth
1 &1/2 cups chicken or beef stock (homemade if possible)
2 cups milk
3 canned plum tomatoes, drained
Salt and freshly ground black pepper to taste

In a very large skillet saute the pancetta and onions stirring frequently about 10 minutes, or so, until the onions barely begin to color. Coarsely grind all the meats together in a food processor or meat grinder.

Stir into the skillet and slowly brown over medium heat. This takes a while because, first, the means will give off a liquid and turn dull grey but, as the liquid evaporates, browning will begin. Stir often with wooden spatula. Protect that nice crust forming on the bottom of the pan you'll use that later. Cook until the meat is a deep brown. Pour the meat into a very large sauce pan.

De-glaze the skillet with some dry red wine scrapping until you loosen the lovely bottom bits. Pour in the sauce pan with the meat.

Stir 1/2 cup stock into sauce pan and let it bubble slowly until totally evaporated. Repeat with another 1/2 cup stock. Stir the last 1/2 cup stock along with milk and adjust heat so the liquid bubbles very slowly. Partially cover the pan and cook 1 hour. Stir frequently to check for sticking.

Add the tomatoes, crushing them as they into the pan. Cook uncovered, very slow bubble, for another 45 minutes or until the sauce resembles a thick, meat stew. I've never had to add salt and pepper but now would be the time so give it a good taste.

Now your done with the ragu. Let's whip up a bechamel sauce. This is easy, very easy.

Bechamel
4 tablespoons unsalted butter
4 tablespoons all purpose unbleached flour
2&2/3 cups milk
Salt and freshly ground pepper to taste
Freshly grated nutmeg to taste

Using a medium-sized saucepan, melt the butter over low to medium heat. Sift over the flour, whisk until smooth, and then stir (without stopping) for about 3 minutes. Whisk in the milk a little at a time and keep the mixture smooth. Bring to a slow simmer, and stir 3 to 4 minutes, or until the sauce thickens. Cook, stirring, for about 5 minutes, until the sauce thickens. Season with salt, pepper, and a hint of nutmeg.

If you cook up a package of lasagna noodles and gently warm the bechamel and ragu, if needed, you can layer all of this, along with a cup of Parmesan cheese, into a 13 x 9 pan, ending with the beschamel and bake for about 40 minutes, covered. Uncover and brown the top for about another 10 min. Let rest for about 10 minutes it will be so much easier to cut.

You're gonna cry when your family or guests gobble this up in what seems like a minute because only you know how damn long it took to make. Just be happy you were smart enough to freeze a batch for the next meal. You did make a double batch, right?


Sunday, July 11, 2010

Gooey Butter Cake

Those three words just say it ALL!!

Sure wish I would have taken a photo of the cut piece with the homemade banana nut ice cream on top. I know good lord I'll have to walk an extra mile of three.

I have heard of this cake but had never, until last nite, had the pleasure of an up close and personal meeting with this tasty treat.

A small gathering of friends got together to say our farewell and best wishes for a wonderful couple that for med reasons must go home for the summer.

One of the gals that works here put the function together and brought this cake while her dear husband made the ice cream. There weren't many of us but the company was enjoyed as well as the desserts.

Try googling gooey butter cake and see the many, many items that come up. Well it seems that when you Google the cake and put in the word butter guess whose name comes up...............Paula Deen = butter. In spite of the Deen connection I did like the cake a LOT!!!  But my thighs are in pain!!

Thursday, July 08, 2010

I found a winner


Well actually I was the recipient of winning this product.

Paula over at http://www.bellalimento.com
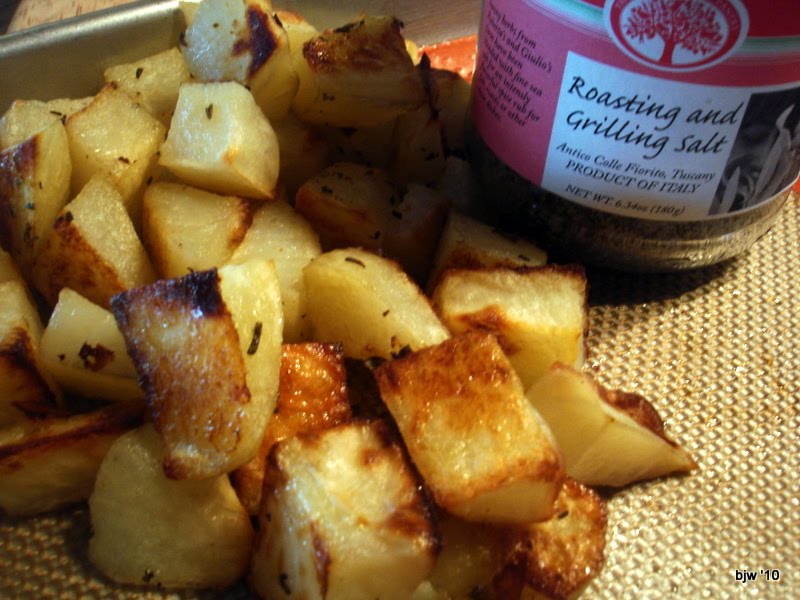
had a giveaway recently and I was the lucky recipient of these two items. The roasting and grilling salt is wonderful. The other item is a sun dried tomato spread that I have yet to use.

The above photo is of some roasted spuds drizzled with a bit of olive oil sprinkle some of the grilling salt and roast in a not (425*) for about 20~25 mins.

Find the grilling salt and their other products here

Wednesday, June 02, 2010

lemon, lemon, lemon


I like lemon just about everything, well with the exception of lemon Jello not so much!!

The following recipe was delivered to my facebook page. We have a birthday celebration function in a couple a days and the celebrant loves lemon, so these will be perfect
I'm hoping. And this is easy cause you use prepared mixes. I know for all you bakers you are just shuddering, but sometimes ya just have to cut corners to save time.
Lemon filled sugar cookies
1 pouch of Betty Crocker sugar cookie mix

1/2 cup whole almonds, peeled
6 tablespoons butter or margarine, melted

1 jar of lemon curd (surprise I have a jar I made )

2/3 cup canned whipped fluffy white frosting (yes canned)

1/2 cup cool whip type stuff

1 teaspoon grated lemon peel

1 tablespoon sliced almonds
  • Heat oven to 375* Spray 36 mini muffin cups with a light cooking spray
  • In a large bowl stir cookie mix, ground almonds, butter and cream cheese until a soft dough forms.
  • Shape dough into 36 ( 1 1/4 inch) balls. Press each ball in the bottom and up the side of the muffin up. Careful because the dough does puff up some.
  • Bake 12 to 15 minutes or until golden brown. Keep an eye on these cause they do brown easily. Cool completely in pan, about 30 minutes.
  • Remove cookies cups from pan, fill each cup with about 1 1/2 teaspoon of the lemon curd.
  • In a small bowl mix frosting and whipped topping until blended well. Spoon a teaspoon of the frosting mixture on top of the cookie cup. Top each with lemon peel and sliced almond. Store covered in refrigerator.
No change for high altitude cooking.