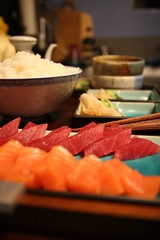
we're lucky enough to live close to a couple of japanese markets. we were by the nijiya market on saturday and stopped in to pick up the fixin's for a nice sashimi dinner. tuna and salmon. simple, healthy and delicious.
Sunday, May 31, 2009


Thursday, May 28, 2009
When life gives you egg whites, make meringues
 I ended up this morning with four egg whites and I can't throw away four egg whites. Nope can't do it. I've tried, I've even froze them thinking I'd do something at a later date and since I already have frozen egg whites that are from the Clinton administration I figured I better use these. Don't try to understand me, just feel sorry for me.
Even though I've collected a dozen recipes for meringues I'd never made any of them. Oh, I've eaten my fair share. There is a lovely bakery in Westlake that make a coconut meringue cookie that is to die for but I've never tried until this morning when I ended up with four egg whites. How I ended up with four egg whites is another post that I will hopefully finish this weekend but you've seen my track record lately, don't get too excited.
Now, the most important thing about meringues is don't open the oven. Sheesh, what a test of my patience. My sister makes a wonderful roast prime rib that you cook for a while, turn the oven off, and let it rest for a few hours. Holy Cats. She had to tie the oven door shut so I wouldn't, you know, just check on it. So here I am with my cookies tucked neatly into their warm little beds and me on the outside tapping on the glass, Open, Open, Open ...
Here's the recipe I used. Could not be more simple, it's just the damn waiting.
 Pecan Meringue cookies
Notes on working with egg whites. Before you start, remove eggs from refrigerator and let them come to room temperature. (A couple of hours will do, or if you are rushed for time, immerse them in warm water for 10 minutes.) Make sure that all bowls, hands, and utensils that might touch the eggs are clean and free from oils.
* 1 cup whole pecans (preferably lightly roasted - 8-10 min at 250°F)
* 3 egg whites
* Pinch salt
* 1 cup sugar
* 1 teaspoon vinegar
Preheat oven to 300°F.
Place pecans in zipper baggie and beat them with a wooden spoon to break into small pieces. Set aside.
Put egg whites into a stand mixer bowl. Add salt. Start the mixer speed on low, gradually increasing the speed until soft peaks start to become visible and the egg white bubbles are very small and uniform, about 2 to 3 minutes.
Increase the speed to medium-high, and slowly add the sugar to the egg whites. Continue to whip the eggs and sugar for a few minutes. Then add the vinegar to the bowl. Increase speed to high and whip the egg whites until they fluff up and become glossy, and stiff peaks form when the whisk is lifted, 4-5 minutes.
Using a rubber spatula, gently fold in the pecan pieces. Drop by teaspoons onto a cookie sheets that have been lined with parchment paper or Silpat. (I piped them from the same plastic bag the nuts were in after cutting off a corner)
Put the cookies sheet in the 300°F oven, close the door and turn the oven OFF. Leave them in the oven overnight. In the morning they should be ready - crisp on the outside, light and airy on the inside. If they are a little marshmallowy or chewy on the inside in the morning, just let them dry out for a few more hours. Makes 12-24 cookies, depending on the size.
Editors note: I did finally get the photos posted. It's not easy taking a snap of something white in something glass. Should be a photo assignment somewhere. The cookies are wonderful. Not too sweet and light and airy.
Monday, May 25, 2009
How we do it: Pie vents
This ever happen to you?
You finally get the pie crust right. You get the fruit in the pie shell and you even get a decent top crust on. Now into the oven it goes and 45 minutes later you have a drooly bubbly goo oozing out of your pie onto your clean oven making a smokey mess. I can't tell you the number of times I've had to remove the pie, toss salt on the gooey mess, make a little foil boat to catch the dripping mess and put the pie back to continue to bake.
What I found out, and from who I just can't remember, is use three pieces of uncooked penne pasta stuck in the crust before putting the pie in the oven can almost eliminate that above scenario. These little steam vents will turn crunch brown but relieve the pressure of you bubbling juices in your fruit pie. Don't forget to remove them and toss them away.

Yes, you can use those cute little ceramic birds to sit in the center but I found this is so easy and it only leaves little holes in the top crust, plus, it's nearly free unless you never use penne. Could that be? Is there someone out there who is planning to bake a pie and has never made penne pasta?
If you put a cookie sheet or something else under the pie it seems to interfere with the proper baking of the bottom crust. My mom always said, your bottom crust needs to be set before the filling bubbles or you'll get that under-done crust. She's right, you need all the heat focused on the bottom of the pie to get it right.
The pie? It's my all time favorite, Pineapple Pie. Check out the link for the recipe.
You finally get the pie crust right. You get the fruit in the pie shell and you even get a decent top crust on. Now into the oven it goes and 45 minutes later you have a drooly bubbly goo oozing out of your pie onto your clean oven making a smokey mess. I can't tell you the number of times I've had to remove the pie, toss salt on the gooey mess, make a little foil boat to catch the dripping mess and put the pie back to continue to bake.
What I found out, and from who I just can't remember, is use three pieces of uncooked penne pasta stuck in the crust before putting the pie in the oven can almost eliminate that above scenario. These little steam vents will turn crunch brown but relieve the pressure of you bubbling juices in your fruit pie. Don't forget to remove them and toss them away.

Yes, you can use those cute little ceramic birds to sit in the center but I found this is so easy and it only leaves little holes in the top crust, plus, it's nearly free unless you never use penne. Could that be? Is there someone out there who is planning to bake a pie and has never made penne pasta?
If you put a cookie sheet or something else under the pie it seems to interfere with the proper baking of the bottom crust. My mom always said, your bottom crust needs to be set before the filling bubbles or you'll get that under-done crust. She's right, you need all the heat focused on the bottom of the pie to get it right.
The pie? It's my all time favorite, Pineapple Pie. Check out the link for the recipe.
Monday, May 18, 2009
Chilaquiles: not just for breakfast anymore
As many cultural dishes do this recipe comes from the peasants side of the table. Usually they are fixed for breakfast from last nights tortillas and salsa. The poor of this planet have always been green.
Chilaquiles (chee lay kee lays) has so many variations but while tinkering about with this recipe I came up with great casserole version. Since I fry my tortillas in oil before assembling my enchiladas I thought I'd combine the two dishes.
Salsa Verda is a sauce of tomatillos, spices, and chillies and you can use homemade or buy it in the store. If you can find salt-free tortilla chips you could use them in a pinch but frying the tortillas isn't very difficult at all. That's the whole idea of using left over tortillas.
Chilaquiles Enchilada Style
1 quart Salsa Verde, homemade or store bought
vegetable oil for frying
12 corn tortillas
2 eggs, beaten
1/2 cup Jack cheese, shredded
2 tablespoons finely chopped green onion
2 tablespoons finely chopped fresh cilantro
In a large pan bring Salsa Verda to boil and turn down to a simmer until thickened a bit.
While that is simmering cut tortillas in wedges or strips and fry in small batches until golden. Remove to paper toweling to drain. Make sure oil is hot enough between batches so the chips don't become oily. Put chips in a very large bowl or pan; big enough to add the sauce and stir.
Return the salsa to a light bubble and whisk in quickly the beaten eggs. The sauce will start to thicken and continue to whisk for about 30 seconds. Pour the sauce over the chips tossing gently as not to break them. Toss until they become soft and absorb some of the sauce. Sprinkle with cheese, onion, and cilantro. Serve hot.
Now this is where I changed my recipe. After you turn off the heat and before you pour the sauce on the chips gently stir in the following:
2 large cooked chicken breasts, cubed
2 green chillies, chopped
1 cup Pepper Jack cheese, cubed
2 green onions; including tops, chopped
Now pour over chips and gently mix. This goes in a 2-3 quart oven-proof dish and into a 375 oven until bubbly. Remove from oven and sprinkle with the cheese, onion, and cilantro. To serve, use a large spoon.
 This photo is before the oven and because it was so yummy, no photo after. I was going away for the weekend so I made the whole recipe, took out three portions, and gave the remaining to our neighbors. I hate to waste anything.
This is great to use leftovers and you can add anything you'd normally put in your enchiladas. Olives, medium cheddar cheese, salsa, and you could certainly leave out the meat if you wanted. The eggs you whip into the sauce makes it very rich and velvety.
Chilaquiles (chee lay kee lays) has so many variations but while tinkering about with this recipe I came up with great casserole version. Since I fry my tortillas in oil before assembling my enchiladas I thought I'd combine the two dishes.
Salsa Verda is a sauce of tomatillos, spices, and chillies and you can use homemade or buy it in the store. If you can find salt-free tortilla chips you could use them in a pinch but frying the tortillas isn't very difficult at all. That's the whole idea of using left over tortillas.
Chilaquiles Enchilada Style
1 quart Salsa Verde, homemade or store bought
vegetable oil for frying
12 corn tortillas
2 eggs, beaten
1/2 cup Jack cheese, shredded
2 tablespoons finely chopped green onion
2 tablespoons finely chopped fresh cilantro
In a large pan bring Salsa Verda to boil and turn down to a simmer until thickened a bit.

While that is simmering cut tortillas in wedges or strips and fry in small batches until golden. Remove to paper toweling to drain. Make sure oil is hot enough between batches so the chips don't become oily. Put chips in a very large bowl or pan; big enough to add the sauce and stir.

Return the salsa to a light bubble and whisk in quickly the beaten eggs. The sauce will start to thicken and continue to whisk for about 30 seconds. Pour the sauce over the chips tossing gently as not to break them. Toss until they become soft and absorb some of the sauce. Sprinkle with cheese, onion, and cilantro. Serve hot.
Now this is where I changed my recipe. After you turn off the heat and before you pour the sauce on the chips gently stir in the following:
2 large cooked chicken breasts, cubed
2 green chillies, chopped
1 cup Pepper Jack cheese, cubed
2 green onions; including tops, chopped
Now pour over chips and gently mix. This goes in a 2-3 quart oven-proof dish and into a 375 oven until bubbly. Remove from oven and sprinkle with the cheese, onion, and cilantro. To serve, use a large spoon.
 This photo is before the oven and because it was so yummy, no photo after. I was going away for the weekend so I made the whole recipe, took out three portions, and gave the remaining to our neighbors. I hate to waste anything.
This is great to use leftovers and you can add anything you'd normally put in your enchiladas. Olives, medium cheddar cheese, salsa, and you could certainly leave out the meat if you wanted. The eggs you whip into the sauce makes it very rich and velvety.
Friday, May 01, 2009
An actual Vegan Recipe
 This might be the only Vegan recipe you'll ever find on PBE but I had to share this.
Last week I attended the LA Times Festival of Books at UCLA. This is my third year and it is always a good day though last year they didn't have any decent authors on the Food Stage. I was very lucky to be there and see a good demo from two authors. Amelia Saltsman author of the Santa Monica Farmer's Market Cookbook was half of one of the cooking demos on Saturday. The other was, Jo Ann Cianciulli , and her book is LA's Original Farmer's Market Cookbook .
Amelia was focused on all farmer's markets and the wonderful fresh local food to by and Jo Ann was more about one the 3rd and Fairfax Original Farmer's Market. I bought her book and even stood in line to have her sign it for me. Something I usually don't bother with but she was so charming I had to ask a few questions.
What I found at the demo was Green Garlic. I know, I'm always a bit late to the party and lil bird had mentioned buy some at her FM a few years ago but I was so intrigued with a very simple vegetarian soup Amelia made I had to find some. Quite surprisingly I found some at Jon's our local ethnic market. It looks very much like Mexican Onions but not. It's actually garlic not formed into a head of cloves with the green tops. Everything is eatable and has a mild garlic flavor. I made the soup and as vegetarian recipes go it wasn't bad and it's very quick to make. Next time I'll saute the leeks and green garlic with bacon to give it a little more flavor; maybe a little cream, too.
Vegan Potato Leek and Green Garlic Soup
- about two cups of leeks, white and just a bit of the green part
- three bulbs of green garlic, remove the roots and chop
- about two cups of cubed red potatoes, don't peel
Now she suggested to puree some of the soup to give it a different texture which I did. I just did a quick few whirs with my stick blender. The flavors are very subtle and I'm sure that's why there is no chicken broth and it's quick, less than 30 minutes and with no milk or meat you could serve this to you Vegan friends. My meat-eating husband ate it for lunch and enjoyed it quite a bit.
The book I bought, LA's Original Farmer's Market Cookbook is great and brought back some fond memories. Little vignettes about the origins of the Farmer's Market and great recipes from some of the food vendors. If you've never been or a regular patron this book is great.
Saturday, April 25, 2009
I found my meatball

I have found many recipes on Simply Recipes that I have kept in my library of favorites. But this one for her meatballs is just the best..............and when my sweet husband raves about a new recipe I know I have a winner.
The addition of ricotta cheese makes for a great taste in my humble opinion. And yes I did add freshly grated parmesan cheese once plated. But lately I have been so bad about taking any photos while cooking I just jumped the gun a bit. I opened a new bottle of wine from a local vineyard we just happened to visit here in Arizona. Beautiful winery and if you like dark red wines you would like this CABERNET SAUVINGNON

Back to the recipe if y'all like meatballs I think you might like this recipe. The recipe makes a bunch so we will be having meatball subs for lunch and the rest I froze.
Monday, April 20, 2009
Is this decadent...............

photo from the food network site cause mine turned out horrible
oh my you betcha it is chocolate over the top decadent, evil and a tad wicked.
Flipping channels awhile back and I heard Giada DeLaurentiis say something to the effect of "be right back with my chocolate honey almond tart". Put the brakes on the remote cause I could wait for that. Now you must like chocolate to be able to handle this decadency. I'll be real honest, this dessert I can only handle in small portions.
Make it and you decide..............
Chocolate Honey Almond TartFlipping channels awhile back and I heard Giada DeLaurentiis say something to the effect of "be right back with my chocolate honey almond tart". Put the brakes on the remote cause I could wait for that. Now you must like chocolate to be able to handle this decadency. I'll be real honest, this dessert I can only handle in small portions.
Make it and you decide..............
Recipe courtesy Giada De Laurentiis, 2008
Prep Time:
10 min
Inactive Prep Time:
5 hr 20 min
Cook Time:
12 min
Serves: 6 to 8 servings
10 min
Inactive Prep Time:
5 hr 20 min
Cook Time:
12 min
Serves: 6 to 8 servings
Ingredients
- 1/2 stick (2 ounces) unsalted butter, cut into 1/2-inch pieces, at room temperature, plus extra for coating the pan
- 9 chocolate graham crackers, 5 1/2-ounces total
- 2 tablespoons slivered almonds
- 3/4 cup heavy cream
- 1/4 cup honey
- 12 ounces semisweet chocolate chips
Directions
Preheat the oven to 350 degrees F.
Butter the bottom and sides of a 9-inch springform pan.
Place the graham crackers and almonds in the bowl of a food processor. Process until the mixture forms fine crumbs, about 15 to 20 seconds. Add the butter and pulse until incorporated. Press the crumb mixture into the bottom of the prepared pan. Bake for 12 minutes. Cool to room temperature, about 20 minutes.
In a small saucepan, whisk the cream and honey together over low heat until the honey has dissolved. Increase the heat to medium and bring the mixture to just below a boil. Place the chocolate chips in a medium bowl. Pour the hot cream over the chocolate and stir until the mixture is smooth. Pour the chocolate filling over the prepared crust. Refrigerate for at least 5 hours or preferably overnight.
Loosen the tart from the sides of the pan by running a thin metal spatula around the edge. Unmold the tart and transfer to a serving plate. Cut into wedges and serve.
Friday, April 17, 2009
Being Green; still
 To me, "being green" can mean a variety of things. Saving energy or using something I'd have just thrown away and, more often than not in this unstable economy, saving money.
Here is a dessert I prepared recently that hit all those high notes. I was using the gas BBQ and I needed to get it very hot and use all three of the burners so instead of letting that heat go to waste I prepared a skillet full of sliced apples with white and brown sugar, a pinch of salt, cinnamon and about a half stick of butter. For the topping I crushed three homemade biscuits from breakfast. I don't like them reheated and made too many for me and my beloved so this was an alternative tossing them in the trash.
After I'd pulled my dinner from the BBQ I put the skillet, covered with foil, on the grill, turned off the center burner and reduced the heat to 325/350 and closed the lid. After dinner, about 30 minutes I removed the foil and tested the apples. That was enough time to cook them and caramelize the sugars. I set them on a board to cool and when we were ready for dessert just spooned the apples into a bowl.
Really any recipe you have for baked apples or an apple crisp should work but using the biscuits was great. The real work for the grill is the preheating so that was already taken care of cooking our dinner. Plus it cooked while we were eating, no fuss.
Sometimes being green is just taking the time to think about how you are cooking.
Share your ideas with us, won't you?
Friday, April 03, 2009
Bite the cookie
 Sometimes I become obsessed with food and make and remake recipes until I like them. Cookies are on the Hit Parade right now so bear with me, folks.
I adore cookies, all types, flavors, and sizes. If I'm thumbing through a magazine cookie photos will make me stop, asses the recipe, and tear it out for later. I've piles of snippets stuck in the back of my cook book. Someday I'll organize them, ha!
Let me sing the praises of the cookie. Easily stored in a variety of containers, put in a slice of bread alongside cookies you want to stay soft, you don't need a fancy jar though I enjoy my crock. You don't need a plate or a fork or any fussy presentation; hands work great. It's portable, you can walk by the cookie jar, on your way to the gym, and snag one or three. They are a favorite of all ages, cultures, and cooks. I bet your family has its favorite and it's time you made them some right now.
Here is my latest Vanilla Pecan Refrigerator Cookies. I can't say where I got this recipe but I do enjoy having a log of refrigerator cookies in the freezer. I can bake the entire recipe or maybe just a dozen for my beloved and me. He likes them, too. Though shortbread cookies are my all-time favorite these little gems are easy, quick and delicious. I've been going for more of a crispy cookie lately and, since there is only white sugar, they fill that order. I used butter but if you use shortening they might be a bit crispier; I'll try that next time.
Vanilla Pecan Refrigerator Cookies
1 cup unsalted butter or shortening
2 cups sugar
2 eggs
2 tablespoons vanilla (yes, this is correct)
3 cups flour
1 teaspoon baking soda
1 teaspoon salt
1 cup chopped pecans (nice if you toast them)
Cream the butter and sugar until fluffy. Add eggs one at a time and beat well after each. Add the vanilla. Combine the flour, baking soda and salt in a separate bowl. Use a spoon to stir in the flour mixture into the sugar mixture. Add the pecans, mixing well. Shape into three rolls about 2 inches in diameter and wrap in was paper. refrigerate at least two hours or up to three days. You can also freeze.
Bake in 375 oven. Cut the dough into 1/4 inch slices 2 inches apart on cookie sheet. Bake about 10 minutes until lightly browned. Cool on wire rack and store in airtight container. Makes about 6 dozen.
 Editor's note: My husband usually can take or leave cookies, I know, why would I marry someone like that? With these he can't keep out of the cookie crock. It has quite a heavy lid so I can always tell when he's in there. I asked what he liked about them and he couldn't put his finger on the reason. Finally, who needs a reason to eat a cookie!
Let us know your family favorite cookie.
Monday, March 30, 2009
Cast Iron Potluck a big success
 Here's an update on my earlier post, Cast Iron Pie. I made the changes I mentioned in the recipe and it was very well received.
We all had fun talking with one another, sharing recipes and techniques, and then sitting down to eat. My Apple Pie wasn't as pretty as the early post but was very tasty. I'll make that again.
Tuesday, March 24, 2009
Plain but perfect
 There are as many sugar cookie recipes as there are families. For roll out cookies I'd made the same recipe over and over until I found Sylvie's on Soul Fusion Kitchen. Perfect for cookie cutters but growing up I remember a plain sugar cookie with the tops dusted with sugar. As luck would have it I found a recipe to satisfy that old memory.
While celebrating Christmas at Mary's, my step-mother, I found some cookies she'd baked but didn't have out. She said they were a little stale. They were exactly what I was looking for, well not the stale part, but I asked her to send the recipe and now I make these regularly. I only make a half recipe because my darling and I would sit down and eat them all and four to five dozen is way too many.
They are dusted cinnamon and sugar and are made with butter and oil and couldn't be easier to throw together. I hope you enjoy them.
Sugar Cookies
1 cup powdered sugar
1 cup white sugar
1 cup margarine (I used unsalted butter)
1 cup cooking oil
Cream together – beat until fluffy.
Beat in 2 eggs
4 cups plus 4 tablespoons
1/2 teaspoon table salt
1 teaspoon baking soda
1 teaspoon cream of tarter
1 teaspoon vanilla
Preheat oven to 350 degrees. Drop by rounded teaspoonfuls onto a greased cookie sheet. In a small bowl, combine some sugar and cinnamon. Using the bottom of a drinking glass, spread with margarine, dip it into the sugar and cinnamon mixture, and press on top of each cookie. Cook for about 10-15 minutes.
Friday, March 20, 2009
Happy find

I don't often do product review/rave but I am doing one here about Panko I use panko a lot in a variety of ways. I just found this new product at my local Safeway/Von's and I'm sure maybe your local market. Go take a look at the web site and see some recipes ideas. If you try it email me and let me know how you like it please. Oh I just used it as a topping for mac & cheese makes for a nice crunchy top.
Wednesday, March 18, 2009
Cast Iron Apple Pie
 Since I'm planning to participate in a Outdoor Dutch Oven demo when we go camping the end of the month I though I'd better try out this new recipe before I did. I saw this recipe on America’s Test Kitchen (www.americastestkitchen.com) on public television's Beg Week and thought I could convert it to iron. I followed the recipe as stated and the product was, ok. I hate, just ok so when I do this again I'll make some adjustments. There are also adjustments to using an Outdoor Dutch Oven.
The sauce had little flavor and was not thick enough. They use cornstarch and I'm not a fan of that to thicken pies so I'd use flour next time. Also, you need to adjust the thickening agent for the different apples. Some, more juicy that others, will take more flour. Now cinnamon is not to everyone's taste but an 1/8 of a teaspoon, who could even taste that. I'll add more. I've made my suggestions in red for the changes to the recipe and green for the adaptation to cast iron.
For the camping trip, I'll pre-make the pie dough and slice the apples and sprinkle with lemon juice to keep them from getting brown.
Skillet Apple Pie
from the Episode: Easy Apple Desserts
If your skillet is not heatproof, precook the apples and stir in the cider mixture as instructed, then transfer the apples to a 13- by 9-inch baking dish. Roll out the dough to a 13- by 9-inch rectangle and bake it as instructed. If you do not have apple cider, reduced apple juice may be used as a substitute—simmer 1 cup apple juice in a small saucepan over medium heat until reduced to 1/2 cup (about 10 minutes). Serve the pie warm or at room temperature with vanilla ice cream or whipped cream. Use a combination of sweet, crisp apples such as Golden Delicious and firm, tart apples such as Cortland or Empire.
Serves 6 to 8
Crust
1 cup unbleached all-purpose flour (5 ounces), plus more for dusting work surface
1 tablespoon sugar
1/2 teaspoon table salt
2 tablespoons vegetable shortening , chilled
6 tablespoons (3/4 stick) cold unsalted butter , cut into 1/4-inch pieces
3–4 tablespoons ice water
Filling
1/2 cup apple cider (see note)
1/3 cup maple syrup
2 tablespoons fresh lemon juice from 1 lemon
2 teaspoons cornstarch (I'll use 4 tablespoons flour)
1/8 teaspoon ground cinnamon (I'll use 1-2 teaspoons)
2 tablespoons unsalted butter (I'll use 3 tablespoons)
(I'll use 3 tablespoons brown sugar)
2 1/2 pounds sweet apples and tart apples (about 5 medium), peeled, cored, halved, and cut into 1/2-inch-thick wedges
1 egg white , lightly beaten
2 teaspoons sugar
Use a 12 inch deep outdoor dutch oven. Pre-heat with 25 coals underneath, lid on, until pan is hot.
1. FOR THE CRUST: Pulse flour, sugar, and salt in food processor until combined. Add shortening and process until mixture has texture of coarse sand, about ten 1-second pulses. Scatter butter pieces over flour mixture and process until mixture is pale yellow and resembles coarse crumbs, with butter bits no larger than small peas, about ten 1-second pulses. Transfer mixture to medium bowl.
2. Sprinkle 3 tablespoons ice water over mixture. With blade of rubber spatula, use folding motion to mix. Press down on dough with broad side of spatula until dough sticks together, adding up to 1 tablespoon more ice water if dough does not come together. Turn dough out onto sheet of plastic wrap and flatten into 4-inch disk. Wrap dough and refrigerate 30 minutes, or up to 2 days, before rolling out. (If dough is refrigerated longer than 1 hour, let stand at room temperature until malleable.)

3. FOR THE FILLING: Adjust oven rack to upper-middle position (between 7 and 9 inches from heating element) and heat oven to 500 degrees. Whisk cider, syrup, lemon juice, cornstarch, and cinnamon (if using) together in medium bowl until smooth. Heat butter in 12-inch heatproof skillet over medium-high heat. When foaming subsides, add apples and cook, stirring 2 or 3 times until apples begin to caramelize, about 5 minutes. (Do not fully cook apples.) Remove pan from heat, add cider mixture, and gently stir until apples are well coated. Set aside to cool slightly.
For DO: Add butter, then apples to the preheated DO. Stir and cook until apples begin to caramelize. Remove DO from coals add cider mixture stirring to coat the apples. Dust in more flour, if needed.
 4. TO ASSEMBLE AND BAKE: Roll out dough on lightly floured work surface, or between 2 large sheets of plastic wrap, to 11-inch circle. Roll dough loosely around rolling pin and unroll over apple filling. Brush dough with egg white and sprinkle with sugar. With sharp knife, gently cut dough into 6 pieces by making 1 vertical cut followed by 2 evenly spaced horizontal cuts (perpendicular to first cut). Bake until apples are tender and crust is a deep golden brown, about 20 minutes. Let cool 15 minutes; serve.
For DO: After you cut the pie dough, place 4 coals on the bottom and remaining on the lid. Most of the heat should be towards the outside with a few in the center. You can see I had not enough on the rim. Turn lid every five minutes 1/4 turn and bake until crust is golden brown. I needed 25 minutes. Resist opening the lid until 20 minutes have passed.

This will be quite hot but it needs to be dished up since the DO hold onto that heat for a long time. I spooned it into bowls.
If you are camping and prep this before hand it is a great dessert. I might even try this in my regular home oven.
Saturday, March 07, 2009
bad yet remarkably neat dog
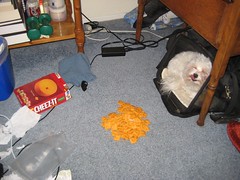
i forgetfully left an open box of cheez-its within dog reach. when i got home from work, the dogs had gotten into the box. if you look in the bottom left of the corner of the photo, you can see that they pulled the inner bag out of the box, then completely emptied the bag into a neat pile. i like to imagine them running back and forth to the cheez-it pile all day long to take one cheez-it at a time. however, it's more likely that this had just happened right before i got home and i caught them in the act.
fwiw, they didn't get in trouble for this, it was my fault for leaving the box within their reach. i made max sit by the cheez-it pile for the photo. i was just lucky i caught him licking his lips when i snapped the pic.
fwiw, they didn't get in trouble for this, it was my fault for leaving the box within their reach. i made max sit by the cheez-it pile for the photo. i was just lucky i caught him licking his lips when i snapped the pic.
Friday, March 06, 2009
Spring time asparagus
if you are an asparagus lover this is just the best time.
We are big time asparagus fans and have it quite often in a variety of ways................one of which is the omelet I made recently.

saute up a bit of the tender, fresh asparagus............I like my asparagus a bit crunchy and definitely not mushy.

We are big time asparagus fans and have it quite often in a variety of ways................one of which is the omelet I made recently.

saute up a bit of the tender, fresh asparagus............I like my asparagus a bit crunchy and definitely not mushy.

add the sauted asparagus and some of your favorite cheese that you shredded not that already shredded dry stuff you buy in the market, add that to your eggs and VOILA!!!
Asparagus Omelet
Asparagus Omelet
Tuesday, March 03, 2009
Zucchini Stir-fry
 Zucchini has always fascinated me. Left raw, it leaves me cold and cooked too much, it's mush. For a long time I've made a stir-fry zucchini dish that would go from perfect to the afore mentioned mush in an instant. It has onions, tomatoes, and zucchini cut into slices and I've experimented with many different incarnations.
After eating a similar dish at the Getty Center for lunch last week I came up with what I think is a winner. The squash held up quite nicely and was still nice and firm the next day for lunch.
Recipe
Two small zucchini squash sliced in 3/4 inch slices
1/2 sweet onion sliced in wedges
1 cup sliced Crimini mushrooms*
1/4 cup pesto without cheese
1 Roma tomato, quartered seeds removed
I made a quick pesto with about a cup of fresh basil, chopped garlic, salt, pepper and enough olive oil to make a paste.
I cut the squash in circles at least 3/4 of an inch wide. This way I could get some "color" on the zucchini without cooking it to death.
I cooked the onions and mushrooms separately, removed them from the pan to saute the squash with the pesto. Then, when it was just barely cooked, I tossed back the onions and mushrooms and quartered Roma tomatoes. This only gets a very quick stir to heat the tomatoes and blend the flavors. Off the heat I tossed in some Parmesan cheese and served.
Thursday, February 26, 2009
Out my door

stands this beautiful tree. The fruit on this tree is a limon, which as you probably know is a cross between a lemon and a lime.
Here we sit in our RV in Mesa, AZ fruit trees everywhere around us. And we are so lucky to have access to this bountiful limon tree.

Asked Mr Doodles to pick me some ripe fruit so I could make a Key Lime pie. Notice the the skin is the lemon but the flesh is the lime, dang these are good so I knew what a great pie they would make.
 Here ya go but this photo does not do this pie justice one bit cause Mr Doodles said "ya know living in the Florida Keys we had access to some of the best key lime pies in the world, this is better than any of those". WOW!!! what a compliment huh? He's my sweetie tho.
Now where I got the recipe I do not know but it is one I have used for years, it's the key lime pie that gives you that tart taste but rich enough to curl your toes.
So if in fact you do partake in this recipe don't email me about the calories I already know, but what is worrisome is that there is still more of the little gems coming ripe on that beautiful limon tree, there goes the hips.
Citrus Key Lime Pie
Crust
2 1/2 cups graham cracker crumbs or cheat like I do sometimes buy a prepared crust
3 tbsp sugar
5 tbsp butter, melted
Filling
1 can (14-oz) sweetened condensed milk
3 large eggs
1/2 cup key lime juice NEVER use bottled juice/regular limes are OK
2 tsp lime zest
Preheat oven to 350F.
In a large bowl, or a food processor, combine wafer cookie crumbs, sugar and melted butter, stirring until mixture resembles wet sand. If you are using vanilla wafers or graham crackers, add 2 tsp lemon zest or lemon extract.
Pour into a 9-inch pie plate and press into an even layer across base and up sides.
Bake for 10-12 minutes, until the crust begins to lightly brown.
Cool completely before filling.
Preheat oven to 300F.
In a large bowl, whisk together sweetened condensed milk, egg, lime juice and lime zest until mixture is smooth. Pour into prepared crust.
***Bake for 20 minutes, until filling is just set.
Cool to room temperature then chill in the refrigerator before slicing.
Top with whipped cream to serve.
*** not everyone bakes their key lime pie..........I always have because of the eggs.
Tuesday, February 24, 2009
Cast iron biscuits: so tender
 The weather is starting to warm up and it's outdoor dutch-oven time, again. The last trip to the beach I brought and bought my cast iron collection to practice for our Tear Drop camp out in March. I've been perfecting a recipe for the potluck, Chili Verde but I tried a new one for biscuits. Who doesn't like the smell of freshly baked biscuits while camping?
Because our weather did not allow me to set up outside I modified my biscuits to the indoor kitchen. Instead of the outdoor dutch-oven I used my ancient iron skillet. This was passed down from my Grandmother, Emily to my Mom, Lorna and then to me. I use it to cook fried chicken, among other things, and it is seasoned to perfection.
My recipe for biscuits is easy:
2 cups AP flour
1/2 teaspoon salt, not kosher
2 teaspoons baking powder
1 teaspoons baking soda
1/2 cup shortening, cold cut into pieces
1 cup buttermilk
1 or 2 tablespoons canola oil
You will need a ten inch iron skillet, hopefully seasoned. If not you can make this in a glass dish.
Preheat oven and iron skillet, 400 degrees.
Mix dry ingredients then cut in the shortening until it resembles course sand. I use a pastry blender but you can also rub it between your fingers.
Pour in buttermilk and gently mix with a fork and dump out on floured surface. Gently knead with floured hands and then fold over a few times and pat it to about an inch thick.
With a floured cutter, I use a wine glass, cut out as many biscuits as you can, then gather the remaining dough together; gently and repeat. Did I say gently enough times?
Remove your hot skillet from the oven and add oil tilting until it covers. Place each biscuit in the skillet. I just touch the top in the oil and roll the biscuit over to get a bit of the hot oil on top. Be careful the pan is hot and it should sizzle. You want to crowd them in so they all touch, I get eight in my 10 inch pan.
Bake for about 18-20 minutes until tops are slightly golden.
 I should tell you to enjoy but I can't imagine anyone not enjoying hot biscuits and honey butter.
If you want to do these while camping use a ten inch camping dutch oven. I put eleven coals on top and only five underneath. Remember to preheat that DO smoking hot before putting in the oil and the dough. Turn every five minutes. Cooking time should be the same.
Friday, February 20, 2009
Birthday cake
 More from the Princess' birthday cake. I was chastised by Laura Rebecca to post more photos and a recipe. Thanks for the prod, Laura. Check out her blog she seems to be a proficient baker.
This recipe is from America's Test Kitchen and I did not change the recipe a bit. Mine came out more dense than I thought but still quite tender. I do believe the key is everything needs to be room temperature.
The first time I made this cake, every cake has an audition in my kitchen, I did not frost it but used the odd vanilla filling I post about last week. Auditioned cakes get shared with my neighbor and she really liked it. She doesn't realize it but she's my food tester. Well, maybe now she does since she does read the blog.
To frost this cake I used a product called "Frosting Pride" I get it at Smart and Final and it tastes like a whipped cream frosting. Very easy and quite tasty you can add color and I've added softened cream cheese before. As you can see, decorating is not my strong suit.
I doubled this recipe for a half-sheet pan
| 2 1/2 | cups cake flour , plus extra for dusting pans |
| 1 1/4 | teaspoons baking powder |
| 1/4 | teaspoon baking soda |
| 3/4 | teaspoon table salt |
| 1 3/4 | cups sugar (12 1/4 ounces) |
| 10 | tablespoons (1 1/4 sticks) unsalted butter , melted and cooled slightly |
| 1 | cup buttermilk , room temperature |
| 3 | tablespoons vegetable oil |
| 2 | teaspoons vanilla extract |
| 6 | large egg yolks , room temperature |
| 3 | large egg whites , room temperature |
1. Adjust oven rack to middle position and heat oven to 350 degrees. Grease two 9-inch-wide by 2-inch-high round cake pans and line bottoms with parchment paper. Grease paper rounds, dust pans with flour, and knock out excess. Whisk flour, baking powder, baking soda, salt, and 1 1/2 cups sugar together in large bowl. In 4-cup liquid measuring cup or medium bowl, whisk together melted butter, buttermilk, oil, vanilla, and yolks.
2. In clean bowl of stand mixer fitted with whisk attachment, beat egg whites at medium-high speed until foamy, about 30 seconds. With machine running, gradually add remaining 1/4 cup sugar; continue to beat until stiff peaks just form, 30 to 60 seconds (whites should hold peak but mixture should appear moist). Transfer to bowl and set aside.
3. Add flour mixture to now-empty mixing bowl fitted with whisk attachment. With mixer running at low speed, gradually pour in butter mixture and mix until almost incorporated (a few streaks of dry flour will remain), about 15 seconds. Stop mixer and scrape whisk and sides of bowl. Return mixer to medium-low speed and beat until smooth and fully incorporated, 10 to 15 seconds.
4. Using rubber spatula, stir 1/3 of whites into batter to lighten, then add remaining whites and gently fold into batter until no white streaks remain. Divide batter evenly between prepared cake pans. Lightly tap pans against counter 2 or 3 times to dislodge any large air bubbles.
5. Bake until cake layers begin to pull away from sides of pans and toothpick inserted into center comes out clean, 20 to 22 minutes. Cool cakes in pans on wire rack for 10 minutes. Loosen cakes from sides of pans with small knife, then invert onto greased wire rack and peel off parchment. Invert cakes again and cool completely on rack, about 1 1/2 hours.
Wednesday, February 18, 2009
A satisfied customer
 This is one of the cakes I made last weekend. The little cake with an E was for the Princess in honor of her first birthday. I made a larger adult cake, too. She wasn't too sure what to do with it but once a piece was cut she picked it up and had a taste. She just didn't want to soil her dainty fingers.
Subscribe to:
Posts (Atom)