Monday, October 30, 2006

happy halloween

a jack-o-latern is technically not food, but the pumpkin conceivably could've been a pie, had i not hacked it to pieces...

jack-o-lantern

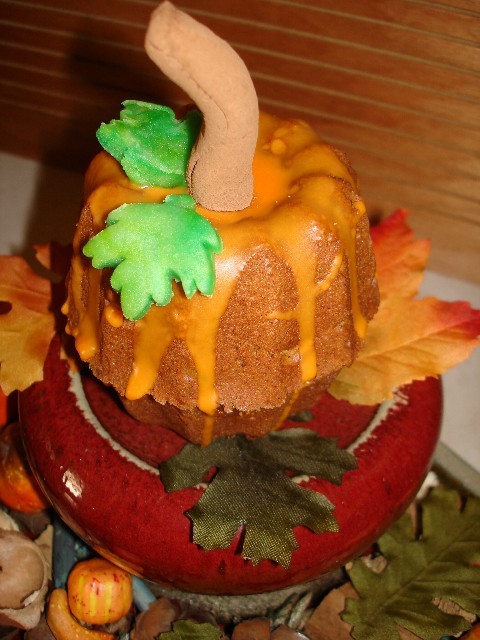
i did sprinkle the lid with cinnamon and cloves, though.

happy halloween, everyone!

Cider question???

It's fall weather, folks are cooking fall food, soups, stews, cider.
Our blogger friend Jeff over at cforcooking posted a blog about cooking with cider.
Never heard of the cider he used, thought probably an east coast product.
Lo and behold while shopping at Cost Plus/World Market guess what I found?
Yes the light green bottle is granny smith apple and the other is the standard dark. Having never cooked with cider, what do I do with these ciders? Send any and all ideas my way please.

Sunday, October 29, 2006

solace in cake form

when your team sucks and lets you down two weeks in a row, make chocolate cake...

chocolate cake

[yes, you can make a box chocolate cake with canned chocolate frosting look good with the right accessories.]

Holiday shipping???

on a food blog you say!!! Well I posted this on my personal blog awhile back. And it was suggested that I post it here as well. Since we are all avid cookers and bakers, but probably not adept in mailing cookies, maybe this might help your cookie gems arrive safely and intact.

Oh, also the fact that blogger friend, LaVidaDulce is about to complete her series on cookies for the holidays. Check out her site there are some dang good ones that she has posted.

Once upon a time husband and I owned a pack and ship store. We mailed a variety of items, some of which I cannot go into. But cookies were a big mailing item. I remember our mom would always mail Valentine cookies to “little bird”. Mom would call husband to consult on packaging. So we came up with the idea that we would put an article in the paper to help people pack the holiday baking items that they may be shipping off. And praying they get their safely


Mailing Cookies
Everyone loves to receive packages in the mail, especially the edible variety. Make sure you get cheers, not jeers, when you mail your elegant eatables.

A big NO NO!
Some cookies tend to ship better than others do. We recommend that you do not mail cookies with custard or custard-like fillings or toppings. The custard could spoil, making a very unwelcome gift. For that matter, any cookie that requires refrigeration is not a good candidate for the shipping. Another type of cookie that doesn't hold up well for mailing is one with a delicate, cake-like texture type cookies.

Yes, yes, yes!
Cookies that have a crunchy or hard texture such as Biscotti, Mexican Wedding Cakes, Crisps, and Shortbreads make excellent choices for shipping. They tend to be fairly sturdy, so you don't have to worry too much about breakage. And since they already have a fairly dry texture, drying out isn't much of an issue.
Cookies that have a slightly chewy texture, like Chocolate Chip, Oatmeal-Raisin, Snickerdoodles, and White Chocolate Cranberry Cookies also ship well. These cookies will tend to dry out if they are in the mail for more than a week, so if their destination is a long way off, you might want to ship them by express to ensure that they arrive just as tasty as when they left.
Macaroons ship beautifully. Their chewy, moist textures only seem to improve after they've aged a few days. Who wouldn't want to receive a single, perfect chocolate-dipped coconut macaroon as a special treat?
Dense bar cookies such as Fudge Brownies, Lemon Bars, or Peanut Butter Bars are delightful to receive in the mail. Just be sure to individually wrap each one with plastic wrap to keep that moist, gooey, dense texture from drying out.

Good things come in secure packages

Once you've baked and cooled your cookies, you're ready for the next step: packing them. There are a few guidelines you should follow when it comes to preparing cookies to be mailed. Follow these and your special packages should arrive fresh, in one piece, and great tasting.
Don't pack crisp and soft cookies together. The moisture from the soft cookies will seep into the crisp cookies, making them lose their delightful crunch.
Don't overstuff your container. Your cookies may be damaged. Likewise, don't under-pack your container. The cookies should fit snugly. If you have too much space, crumple up a bit of newspaper or towels to fill the holes.
Pack cookies in a sturdy tin or airtight container. On the bottom of the container place a piece of bubble wrap, then line the container with parchment paper or cellophane, leaving enough to tuck over the top once the container is fully packed. Place one layer of cookies in the container. Cover with parchment paper. Arrange another layer of cookies, followed with more parchment paper, and continue this layering until the container is full. Tuck the cellophane or parchment paper over the top, then place another piece of bubble wrap on top, and seal your container.
You now need to pack your tin or container in a heavy-duty cardboard box that's large enough to allow a two- to three-inch cushion between the tin and the wall of the outside box. Place a layer of shipping peanuts, crumpled paper on the bottom of your shipping box. Set your cookie tin on this bottom layer. Then fill in the sides and top with more shipping materials. Seal the shipping box with two-inch-wide shipping tape. Place a mailing label on the box, and you're ready to send those treats on their way. Rest assured that you will surely be receiving a call of gratitude.

Someday I’ll tell y’all bout the Key Lime pie that we shipped.

Thursday, October 26, 2006

Happy Halloween - Pumpkin Bread

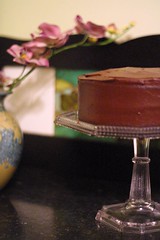
I have never admitted to being a baker, sister moon is the baker in the family. But when I saw this cake on the front of a magazine awhile back I thought how cute I could do that.

I volunteer at the library from time to time when they need readers for the childrens group. Well this Saturday is the Halloween reading and the library was going to provided treats for the little darlings. I thought I would make these cake/bread thingies and the adults could have a treat as well.

Cakes are made in a six inch mini bundt pan. I put two cakes together with some pumpkin butter I just happened to have, but you could use any frosting to adhere the two pieces. The orange drippy stuff is confectioners sugar and lemon juice dyed orange.The green leaves are marzipan and the stem is made of marzipan rolled in cocoa. The flash made it appear (LOL) much lighter in color than it really is. The remaining batter I made in a loaf pan and froze after cooling.

Lesson learned: Don't fill the pans all the way up because then they will look like cupcakes and you will have to cut the tops off. Wear gloves when making leaves cause food coloring does dye the finger nails.

I used the following recipe, but you could use anything, even a cake mix of your liking.

This recipe is adapted from Gourmet magazine of several years ago.
You'll need 2 loaf pans for this recipe, or 6 of the mini onesI use the disposable ones. I also use small bundt pans.

Nonstick vegetable oil spray
2 cups chopped nuts, walnuts or pecans (reserve some for on top)
3 1/2 cups unbleached all purpose flour
2 teaspoons baking powder2 teaspoons baking soda
1 1/2 teaspoons salt
1 1/2 teaspoons ground cinnamon
3/4 teaspoon ground nutmeg
1 teaspoon pumpkin pie spice
3 cups canned pure pumpkin (I believe the can is 29 ounces I just use the whole can)
1 cup sugar
1 cup (packed) lite brown sugar
1 cup vegetable oil
4 large eggs
3/4 cup buttermilk

Preheat oven to 350°F. Oil pans to prevent sticking

Combine flour, baking powder, baking soda, salt, cinnamon, nutmeg and pumpkin pie spice in medium bowl; whisk to blend. Mix in nuts. Using electric mixer, beat pure pumpkin and both sugars in large bowl until blended. Gradually beat in oil, then eggs 1 at a time.Stir in dry ingredients alternately with buttermilk, little dry little buttermilk. Divide batter among prepared pans. Sprinkle with reserved nuts. A friend made this recipe and garnished it with toasted pumpkin seeds
Bake breads until tester inserted into center comes out clean, about 1 hour. Cool in pans.
(Can be made 1 day ahead. Cover; store at room temperature.)

What I like about this bread is that it is not sweet, add raisins if you care to, plus this bread freezes well.

Don't serve ravioli to an Italian

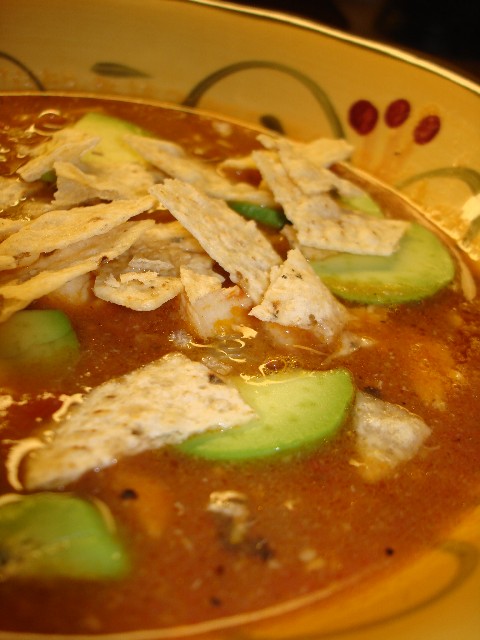
Two of my women guests were put to work on the antipasti while I got the bread in the oven. Doesn't it look good? Unfortunately it was the second course that started the downhill slide. What was so slippery? Homemade ravioli. I have a pasta press and have made noodles but ravioli has always been a favorite of mine so here was my chance.

Yikes, not as easy as it looks on TV. A few exploded but I did manage three for each serving. Oh, and it's back to school for me to learn how to make a browned butter sauce. It was more of a burnt butter sauce by the time it was served. Sage leaves were tossed in and they were actually quite good, the crunch was relief to the slippery little pillows. Pix? No way. By this time I couldn't bear to get the camera.

Michael Chiarello lied when he said make the dough as thin as you can. They looked more like dimsum than ravioli and an Italian at the table said his mother would use a fork to crimp the sides closed. Good suggestion because I will try this again. Our mother didn't raise quitters--no matter how many friends I have to go through--I will get this right.

Next post: pink gravy?

Tuesday, October 24, 2006

Recipe by the book

I like many of you who enjoy cooking, I like to experiment. This is one recipe I can honestly say I did not deviate one bit.

Creme Brulee is a favorite of mine, not so much husbands. In our past life we frequented one restaurant quite often. We knew the owner quite well and he introduced us to the chef. Come to find out he was a neighbor and we became fast friends. His creme brulee was very close to this recipe. Mark always said I was his best customer for his creme brulee.


Creme Brulee Recipe courtesy Alton Brown, 2005

1 quart heavy cream
1 vanilla bean, split and scraped
1 cup vanilla sugar, divided
6 large egg yolks
2 quarts hot water
Preheat the oven to 325 degrees F.
Place the cream, vanilla bean and its pulp into a medium saucepan set over medium-high heat and bring to a boil. Remove from the heat, cover and allow to sit for 15 minutes. Remove the vanilla bean and reserve for another use.
In a medium bowl, whisk together 1/2 cup sugar and the egg yolks until well blended and it just starts to lighten in color. Add the cream a little at a time, stirring continually. Pour the liquid into 6 (7 to 8-ounce) ramekins. Place the ramekins into a large cake pan or roasting pan. Pour enough hot water into the pan to come halfway up the sides of the ramekins. Bake just until the creme brulee is set, but still trembling in the center, approximately 40 to 45 minutes.
Remove the ramekins from the roasting pan and refrigerate for at least 2 hours and up to 3 days. Remove the creme brulee from the refrigerator for at least 30 minutes prior to browning the sugar on top. Divide the remaining 1/2 cup vanilla sugar equally among the 6 dishes and spread evenly on top. Using a torch, melt the sugar and form a crispy top. Allow the creme brulee to sit for at least 5 minutes before serving.

Monday, October 23, 2006

Guinea Pigs love cookies


I invited friends over to test some recipes on Sunday and I served Grandma's Butterscotch Cookies and La Vida Dulce's Chocolate Shortbread with vanilla ice cream and Michael Chiarello's Balsamic Caramel Sauce. We didn't start with dessert but this might have been the best course. Remember, these friends were guinea pigs and I'm not so sure the main course came together like I planned so I'm going to leave the rest of the menu for a later post.

First, if you only make one cookie this holiday season make it the Chocolate Shortbread. It is so incredibly melt-in-your-mouth rich and quite easy. Too easy if you ask me because you can throw this together in a moment's notice and who needs that sort of temptation.

Now if you really want something different do try the Balsamic Caramel Sauce. I wasn't too sure but the sweet of the ice cream balances the balsamic vinegar. I had a little push back from a few of the guests but won over one of them. Hey, I surprised myself, too. It was good.

So, what did I learn? Sometimes you need to step outside your apron and try something you've never cooked before. Now Doodles says she has a Roasted Pears with Caramel sauce recipe on her del.icio.us ... and I have all this leftover sauce, hmmmm, sounds like something new.

Friday, October 20, 2006

My version of Tortilla Soup

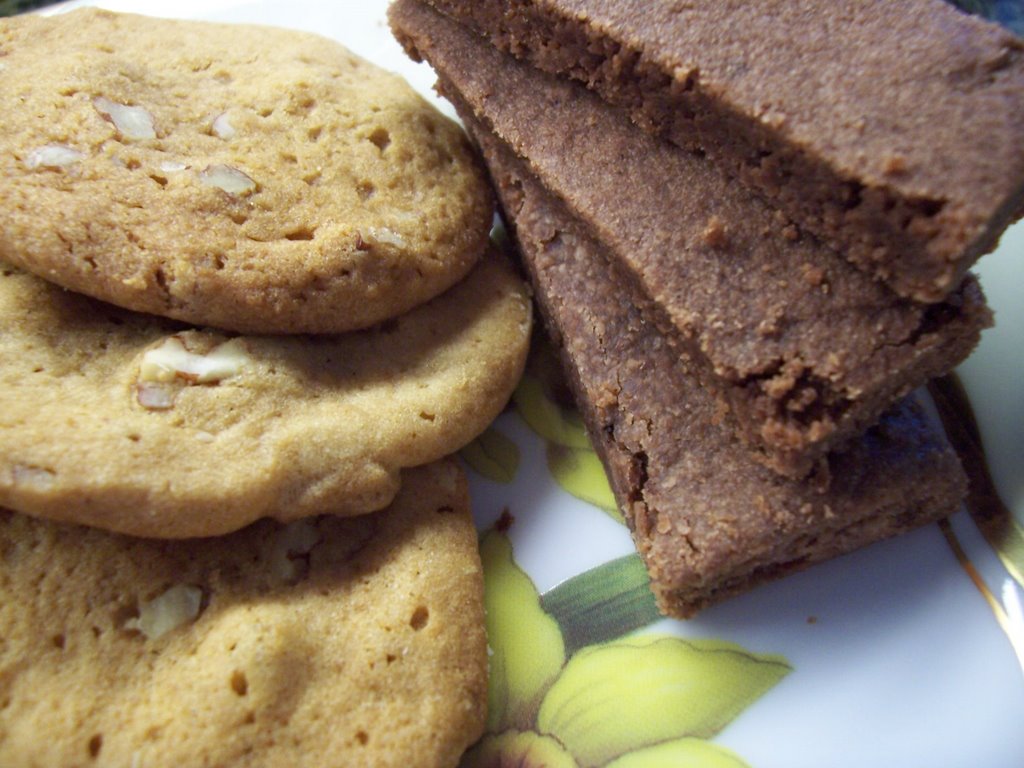
Dang this was good. Although a few zantacs were passed around at the completion on the meal.

My love for Muir Glen fire roasted tomatoes is well known, I had some leftover chicken breast that I diced up and some of that mean green sauce that moon posted a few days ago.

I chopped up a small onion, added the chicken once the onion was sauted, poured the mean green sauce over the chicken and added a half a container box of low sodium chicken broth.Let that simmer for a bit and added my can of fire roasted tomatoes, added the remainder of the chicken broth and let simmer for about half hour. Had a can of white hominy, rinsed it well and added that to the pot. Now remember the mean green sauce already has a lot of seasoning so extra is not need. Taste as you go.

Once the hominy is heated thru it tends to thinken the soup, so I added another box of chicken broth. Finished it off with tortilla strips lots of em as husband says, slices of avacado, and some fresh cilantro.I had made corn muffins earlier and added a can of chopped green chiles to the batter.Find the similar recipe here at the Muir Glen site. Try it if you like spice, adjust it if you don't.


Thursday, October 19, 2006

A new addition to the family

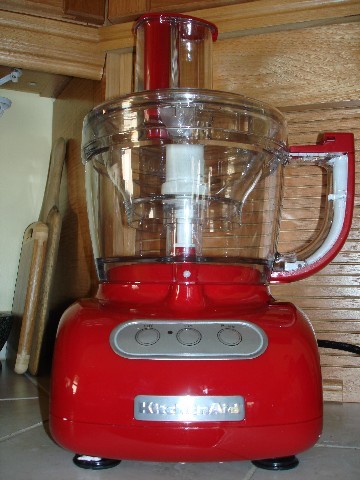
Well it's a new addition to my appliance family. I have been wanting a new food processor for a very long time. I am blaming this purchase on Jeff because when I saw the one he got I was in a state of envy.

It matches my car, although it was not a priority. Husband said that the lawnmower doesn't have as powerful motor ;)It's a Kitchen Aid 12 cup, 750, with a mini bowl. I have not used it yet, and I don't know what I'm waiting for, BUT it sure does look nice in my appliance garage.
stay tuna'd


Wednesday, October 18, 2006

Mmmmm; pepperoni


If you will remember when I got back from New Jersey I spoke fondly of a local treat, Pepperoni Bread. I needed to make it before it was just a memory so this week I bought some Bridgeford frozen bread dough, sliced pepperoni along with mozzarella, parmesan, and fontina cheeses.

This was too easy but sooooo good.

Defrost the bread dough and roll into a rectangle.
Shred the cheeses and layer with lots of pepperoni slices.

Roll this up like a jelly roll but don't cut, leave whole, tuck under the ends
Brush with olive oil and let rise in a warm place, about 30 minutes.

Bake 375 for twenty minutes. It should be nicely browned and sound hollow when tapped. Brush crust with melted butter.

Eat as soon as it is cool enough, I burnt my mouth but it's up to you if you want to wait that long. It will smell like pepperoni and what could be wrong with that.

Bridgeford makes pretty decent bread. I've used it before for cinnamon rolls but this was the first loaf. If it turned out I was going to make my bread from scratch but this was too easy and was quite tasty, just like the original in Jersey.

Tuesday, October 17, 2006

chocaholics click here

after visiting the kitchen wench site where she mentions that her breath smells, smells of chocolate, geeesh how bad could that be.

I remebered I had come acrossed this site about truffles. Now I have never mad a truffle in my entire life, but I have eaten a few, some good, some OK and some to die for. Like that one moon and I had in Indiana, remember.
Anyway for you adventurous sould that would like to partake in making a truffle, please let me know how you did. I try this. But I would love to hear experiences and lessons learned so stay tuna'd...

Sunday, October 15, 2006

And that's how it was in the 1940's

Laura Rebecca has always been able to come up with some great fun challenges.
LR's Retro Recipe Challenge has been very educational and a trip down memory lane.

The 1940s were all about rationing, protein stretching, substitutions, and making do with less. Home cooks made sugarless cookies and meatless meals. Cookbooks, magazines, government pamphlets, and food company brochures were full of creative ideas for stretching food supplies. Why the shortage? Food was needed to feed soldiers fighting World War II. Farmers and food manufacturers were tapped to supply growing military needs, thus creating a shortage of foods available for domestic civilian consumers.
Rationing was introduced in the United States by the Office of Price Administration in 1942 as a way to equitably distribute diminishing food supplies. The American government encouraged homeowners to create Victory Gardens, small plots of fruits and vegetables to supplement personal and community food supplies. Nutrition information was also widely disseminated to help home cooks create balanced meals for their families. The National School Lunch Act was passed in 1945, extending Roosevelt's New Deal WPA commitment to feeding America's hungry children. After the war, many new products were introduced to the American public. These "convenience foods" (dehydrated juice, instant coffee, cake mixes, etc.) were the result of military research. Not all of these were embraced enthusiastically, as traditional homemakers preferred to cook "the old fashioned" way once rationed ingredients were readily available.

During WWII, approx. 1942-1945, butter, fats, sugar and meat were rationed. I have read you were only allowed to buy 1 pound of meat per person, per week. Recipes for cakes and other 'goodies' using honey and sugar substitutes were popular. It was very common for even city dwellers to have patriotic "Victory Gardens" where they raised their own vegetables, including beans and tomatoes. This reduced the number of people who had to be employed in agriculture, so they could produce weapons or fight the war.

the above information was taken off the internet when 1940 recipes were googled.


My food of choice for Retro Recipe Challenge would be tomato soup and a grilled cheese sandwich. Now back in the 40's it wouldn't have been a cream of tomato and probably not an abundance of cheese that the photo depicts, remember they were all in the ration mode at the time. The soup was probably Campbell's with a can of water added, eeek! And the grilled cheese was probably made with white bread, two eeeks!! But in those days it was made with love just like today. And if we were really good we probably got a pickle to accompany our sandwich.


Friday, October 13, 2006

cue balls arrive in florida


Sister moon wrote about these a few blogs ago
http://pbetouffee.blogspot.com/2006/09/rack-em-up-cue-balls-on-grill.html

After much prodding, my little farmers market guy finally was able to secure some cueball zucchini. Green and yellow zucchini on the indoor grill cause the outdoor grill was getting rained on. The green round guys are more dense and less watery, creating a sweeter flavor in my opinion.

Anyway brushed them with olive oil, crushed garlic, lots of fresh ground pepper. Prior to brushing them with the herbs I squeeze some lime juice on them. Finished them off with a sprinkle of kosher salt and some cilantro. Great side dish.

Thursday, October 12, 2006

basil coming out my @$#

so the crop share featured an abundant amount of basil this week (three huge bunches). check it out...

basil

other than the temporary home decoration use, what am i going to do with all of this freakin' basil? we're getting a little sick of pesto and i made basil oil last week. i'm running out of ideas. help a sister out, people.

p.s. kalyn, you don't need to answer! i've already got one bunch set aside for your brilliant freezing technique. :)

Chilly weather is finally here


About August I didn't think I'd be saying this but it's time to cook chili! Damn us Californios had us some hot weather this summer, not unlike the rest of the country. So now all the ugly electric bills are behind us let's get cookin' some tummy-warmin', not to mention soul burnin' chili.

I have this burning question, how do you make chili? From a recipe or just start throwing chili-like ingredients in a pot and hope for the best? This isn't really a challenge just something informal from our readers. Add a comment, long or short or send an e-mail and share your chili favorites or your own secrets.

My chili? I slow cook some beef shanks or ribs or any other bony beefy thing with some dried and fresh chilies and garlic and onions and tomatoes. Somehow in the end it becomes chili good enough to eat. I'm always a bit amazed it comes together.

Sunday, October 08, 2006

Vanished!!!

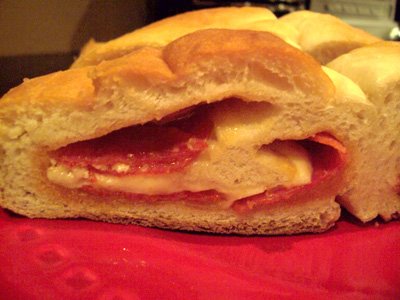
I made four yes FOUR dozen chocolate chip cookies and this is what I have left!

We had a real estate open house today. When I saw La Vida Dulce's
Chocolate Chip Cookie recipe I thought that could be the cookie that sells this place.

this is the plate I found when we returned home, holy cow all had vanished, three little cookies remained.

Have yet to hear from our realtor.


Next open house if required, will the the famous "scutterbotch" cookies...stay tuna'd

Saturday, October 07, 2006

Here's a crock


This crock, my now cookie jar, was my grandmother, Emily Prucilla's and it served her well for decades. I inherited it when my mom passed away because it was always my favorite. I nearly had a breakdown when I dropped the lid and it broke in two pieces but darling husband, to the rescue, patched it up.

I try to keep it full of cookies, these are Alton Browns chocolate chip (just for you, Jeff) but what I really want to make is a recipe of Grandma's that I recently rediscovered. She called them "scutterbotch" and each generation loved them. Along with the recipe was the following letter my mom sent to her family and friends after her mother's passing in 1991.

The time is fall of 1931. The people knew by then that the country was in serious trouble. Unemployment, failed banks, and closed factories plagued he towns and cities but in Monroeville, Indiana a small farming community close to the Ohio border, poor farmers were still poor farmers. My father, an engineer, moved his family to a farm to soften the blow of the depression. I was nine, my sisters Mary Alice and Marcella were seven and five. Our little brother Tom was two; Joseph was yet to be born.

As was typical of the day the big white farm house had a large kitchen with a wood burning cook stove. Here mother Emily would bake the most wonderful butterscotch cookies. At night she would mix up a batch and then early in the morning she would bake them. The smell of those cookies would walk us girls up and on those mornings we would waste no time getting ready. The smell always meant there would be cookies for breakfast and some in our lunch.

As time went by we sold the farm and moved to the city. Our brother Joseph was born and six weeks later, Daddy Tom died. He left Emily to raise the five children alone. Times were hard. Emily had to work to support her family but she always found time to make us a batch of butterscotch cookies. Mother died May 13, 1991. At that time I had two dozen cookies in the freezer. I had made them under her directions some weeks before her passing.

This morning, as I write you this letter, I am having butterscotch cookies with my coffee; the smell of cookies still lingers on.

Love, Lorna

Butterscotch Cookies
1 cup oleo,* that's shortening for you young uns.
2 cups brown sugar
2 eggs
3 1/2 cups flour
1/2 teaspoon salt
1 teaspoon soda
1 cup chopped nuts

*you could use butter and they would be delicious; they just wouldn't taste like Grandma's.

Mix sugar, eggs, and oleo. Add flour salt and soda; mix well. Add nuts. Divide into two rolls and wrap in wax paper (plastic wrap is fine). Chill overnight. Cut 1/4 inch and bake 8-10 minutes at 375 until lightly browned. Do not overbake.

Note: Her rolls were never round they were flat on the sides producing an oblong cookie but I always made them that way, too.

Thursday, October 05, 2006

No more calls, we have a winner

We've posted a few references to an L.A. landmark, Olvera Street and our favorite taquito stand, Cielito Lindo. See posts one and two. I was real surprised to get a few request for the sauce recipe. I've tried many times to replicate and finally gave up, jeeze, it's only about forty miles to LA.

The request saying they'd take anything close so I thought I'd give it one more try. I mean I do fancy myself a pretty good cook and I've eaten enough of their guacamole--I should be able to get closer. I'd even seen a recipe in a cook book, god only knows where, that says cook the sauce to change the raw taste.

This is not your typical guacamole, it is thin and strained of any seeds. You really don't even taste the avocado there is so little.

Taquito sauce

1 can of Herdez Salsa Verde, or something that has tomatillos, onions, serrano peppers, salt, and cilantro.
1/2 ripe avocado
about 1/2 cup cilantro, packed
one serrano pepper, no seeds

Blend this in a food processor until smooth. Add salt to taste or extra serrano peppers if you like it hotter. Strain out all the seed.

Now here's the odd part, bring to a simmer over medium heat and cook for about five minutes. Don't boil, just simmer, this isn't a reduction. Thin with a bit of water or chicken broth. This is a real thin sauce. Maybe as thin as tomato juice. Cool and refrigerate.


So I made this a few days ago and damn, if I didn't come closer than I'd even hoped. It is lacking something I can't put my finger on, maybe thinning with chicken broth would be it. If you make it and you've eaten at Cielito Lindo's you tell me. For now, I think I'm satisfied.

Wednesday, October 04, 2006

another breakfast for dinner

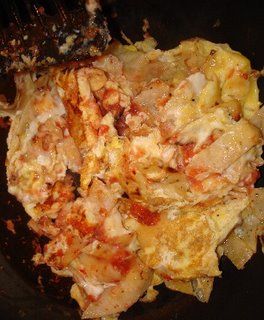
Fellow blogger at Mixed Salad Annie brought up an interesting question what is your favorite breakfast for dinner?I mentioned in the comments that her choice happened to be my second choice.
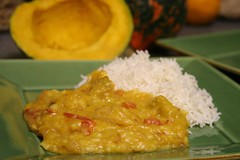
My first choice would be Migas……………

Our Dad made, what he called, tortilla and eggs. The first time I had them I fell in love with them. But for some reason husband is not fond of this dish, so I fix them for myself when I know he is not gonna be home for dinner.I have never used a recipe but I did find several on line. Migas (pronounced MEE gas) is eggs, bits of corn tortilla, and a host of savory ingredients, from black beans, chorizo and cheese to salsa, avocado and chiles. The word, migas, in fact, is derived from the Spanish word for crumbs.


Migas with Fresh Tortillas
4 large eggs
a few tablespoons salsa (your favorite, it can be the chunky variety)
1 tablespoon butter
1 tablespoon oil3
6-inch corn tortillas, cut in to strips
1/4 cup finely chopped white onion
2 tablespoons chopped green chiles (I use the canned)
1/2 cup chopped avocado, sprinkled with a little lime juice
2 teaspoons minced fresh cilantro
2/3 cup grated Monterrey jack cheese
sour cream
In a small bowl, lightly beat together the eggs and set aside.Warm the butter and oil in a heavy skillet. Add the chopped onion and sauté until it is transparent. Add the tortilla strips and sauté until just a bit crisp Stir in the chopped green chiles and the salsa.Pour the eggs into the skillet, and "scramble" until eggs are done. Remove the skillet from heat, and sprinkle the chopped avocado, cilantro and cheese into the eggs, again stirring well.Serve at once with warm flour tortillas like you would eat toast. Garnish with additional salsa and sour cream

Note: This recipe makes two servings, but it can easily be doubled or tripled or more for a larger crowd. Migas are a terrific brunch dish. Chop the onion, green chiles, tomato, avocado and cilantro before you start the migas so they'll be ready when you need them.

In addition to the ingredients called for in this recipe, some additional possibilities for enhancing your migas are:
crisply cooked and crumbled bacon · Salsa verde· chopped ham · crumbled chorizo (browned before you add the eggs) · cooked, shredded chicken or turkey · grated or diced potato (sautéed until tender before adding the eggs) · poblano chiles · green Bell pepper · green onion · crushed red pepper flakes


Monday, October 02, 2006

parsi dhansak

parsi dhansak

i am a big fan of indian food, but it's never been really accessible for me in terms of cooking at home. trader joes has a few jarred sauces that aren't too bad, but not exactly authentic. i've purchased a few cookbooks in the past, but never really been able to produce anything that was quite authentic. unfortunately, i just don't have access to an indian grandmother. i really love dal (lentils) and i've tried to cook them before, but i've never been able to get that indian restaurant consistency to my end product. i almost gave up...

enter, the internet. i've been lurking on some very cool indian cooking blogs for some time now, religiously delicio.us-ing recipes. some of my favorite sites are saffron trail and sailu's food. i came across a great recipe the other day on saffron trail, for parsi dhansak, which uses pumpkin and dal. i was very excited to try this, because i received some pumpkin (well, kabocha squash) in my crop share the other day and wasn't quite sure what i was going to do with it. you can check out the recipe here.

simply put, this dish was just plain rad. it had the right consistency and the right flavor. it actually seemed like something i would get at a restaurant. my bunky really liked it, too, and actually ate a vegetarian meal without asking why he was being served just a side dish. i have to thank nandita at saffron trail for sharing this recipe and helping me along the road to learning how to make home cooked indian food. now that i have my feet wet, i'm really looking forward to trying out some more recipes.

even better, this dish is good and good for you: there's only about two tablespoons of oil in the whole thing; lentils are a great source of vegetarian protein; and pumpkins are rich in vitamin c, beta carotene and fiber. in fact, pumpkins are an anti-oxidant rich food, which makes this a perfect entry for sweetnicks' arf/5-a-day tuesday!

Sunday, October 01, 2006

A nip in the air............

Everywhere you go there is mention of fall. Wish someone would tell the “weather gods” that are in charge of Florida.
All the magazines have a fall cover from food to decorating.So the temperature dropped four degrees, I made soup…………..I look for any excuse to make soup, especially the creamed variety.
Our mom was a terrific soup maker. I remember she was the first to introduce me to creamed asparagus soup as well as creamed broccoli soup. One of my husband’s favorite cream soups is roasted red pepper and tomato.This recipe is one that I concocted from an assortment of recipes. You know take a bit of this recipe and add it to that recipe……tada there now it’s our own. We all do it!

Roasted Red Pepper and Tomato Soup
2 large red peppers*
2 cans of Muir Glen fire roasted tomatoes (14 oz.)
3 cups chicken broth or vegetable broth
1/4 - 1/2 cup cream
1 tbls olive oil
1 medium onion about ½ cup
2 large garlic cloves, crushed
1 tsp smoked sweet paprika
salt and pepper to taste1.

Roast peppers in a 400F oven until skin is blackened. Let rest in a sealed paper or plastic bag for about 15 minutes, then peel off the skin, seed, remove membrane and chop into chunks.
2. Briefly sautee (5 minutes) in olive oil onions and garlic in a medium pot. Add tomatoes (with juice) and chopped peppers and cook on high to reach a boil then reduce to simmer for 15 minutes, or until tender.
3. Add stock and spices. Feel free to add some red pepper flakes or chipotle powder for spicy kick. Add cream and bring to a boil, then slow simmer for 15 minutes. I use an immersion type/boat motor blender to puree the soup to a desired consistency.
4. For a finishing touch, when plating, add a dollop of sour cream and some chopped cilantro. Or croutons spread with a pesto. I also like a splash of sherry at the very end. This version I put a thin slice of asiago cheese and popped it under the broiler till cheese melted

*you could use the jar variety of red peppers but remember to get the roasted red peppers packed in water not vinegar.

Lesson learned………….as jeff would say!! If you use a regular blender cool the contents down somewhat prior to pureeing and leave the lid ajar a tad cause if not you’ll have a mess.

Do you have a favorite cream soup?